
Wix Pro Gallery is the advanced gallery option in the Wix Editor - it gives you more layout choices, better image quality, and more customisation options than the standard Wix Gallery. You can use it to display photos, videos, or a mix of both, with layouts ranging from a uniform grid to a free-form collage. This guide walks through the full setup process and explains each option so you know what you are configuring.
Is Wix Pro Gallery Free?
Yes, Wix Pro Gallery is available on all Wix plans, including the free plan. You can add a Pro Gallery to any page at no extra cost. The limitations on the free plan relate to storage and bandwidth - not the gallery feature itself:
- Free plan: 500MB storage total for your whole site. Pro Gallery is available but your total media is limited.
- Light plan ($17/month): 2GB storage. Suitable for small portfolios.
- Core plan ($29/month): 50GB storage - enough for large photo galleries and video collections.
- Business and above: 100GB+ storage with no Wix branding on the site.
If you plan to display a large number of high-resolution images, upgrading to at least the Core plan is worth considering so you do not run into storage limits. See our guide on how to check your Wix storage space for a breakdown of each plan's quota and tested ways to free up room.
Wix Pro Gallery vs Regular Wix Gallery: What Is the Difference?
Wix offers two gallery options: the standard Gallery and the Pro Gallery. Here is how they differ:
- Standard Gallery: Simpler, fewer layout options (Grid, Slideshow, Accordion). Good for basic photo displays. Less customisation of spacing, borders, and hover effects.
- Pro Gallery: More layout types including Masonry and Collage. Full control over spacing, borders, item size, and hover effects. Supports mixed media (photos and videos together). Built-in lightbox with navigation arrows. Better performance optimisation for large collections.
For most sites that need a professional-looking image display, Pro Gallery is the better choice. The standard Gallery is only worth using if you need a very simple slideshow with minimal configuration.
Step-by-Step Guide: How to Add and Set Up Wix Pro Gallery
Here is how to add Wix Pro Gallery to your site from start to finish:
Step 1: Log into Your Wix Account
Go to Wix and log into your account. If you are new to Wix, sign up using your email address or a social media login. Existing users can skip directly to the next step.
Step 2: Open the Wix Editor
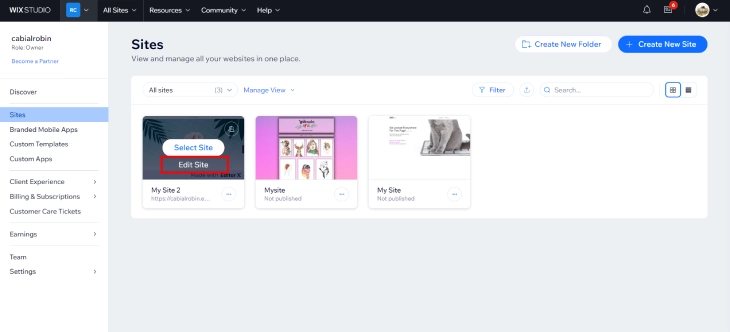
From your dashboard, click Go to All Sites, select the site you want to edit, and click Edit Site. Navigate to the page where you want to add the gallery.
Step 3: Add the Wix Pro Gallery

Click the + (Add Elements) button on the left panel of the editor. Select Gallery, then choose Pro Gallery from the gallery type options. A default gallery element will appear on your page. Drag it into position and resize it as needed.
Step 4: Upload Your Media

Click the gallery element to select it, then click Manage Media (or double-click the gallery). The media manager opens. From here you can:
- Upload images and videos from your computer
- Choose from previously uploaded files in your Wix Media Library
- Add images from Wix's free stock photo library
Wix Pro Gallery supports JPG, PNG, GIF, and WebP images, and MP4 video files. For best results, upload images at a minimum of 1200px wide - the gallery will optimise them for different screen sizes automatically.
Step 5: Choose a Layout and Customise Your Gallery
This is where Pro Gallery gives you the most control. Click the gallery and then click Settings or Design to access the customisation options.
Layout options:
- Grid: Uniform rows and columns - all images are the same size. Clean and structured. Best for product images or any collection where you want equal visual weight across all items.
- Masonry: Variable-height columns where images keep their original aspect ratios. Pinterest-style layout. Best for mixed portrait and landscape photography where you don't want images cropped.
- Collage: A free-form mixed layout where images vary in both width and height. Creates a dynamic, editorial look. Best for lifestyle brands or portfolios wanting a creative feel.
- Slideshow: One image at a time, full-width, with left/right navigation. Best for hero sections or sequential storytelling (e.g., a step-by-step project reveal).
- Thumbnail: Small thumbnails displayed in a strip below a main preview image. Best for product galleries where visitors need to browse multiple views of the same item.
- Panorama: Horizontally scrolling images, all the same height. Best for wide landscape photography or timeline-style displays.
Design settings to adjust:
- Spacing: The gap between images. Zero spacing creates a tight mosaic; larger gaps give a more airy layout.
- Image ratio: For Grid layout, you can lock all images to a specific aspect ratio (e.g., 1:1 for squares, 4:3 for landscape crops).
- Border and corners: Add a border with custom colour and thickness, or round the corners of each gallery item.
- Hover effects: What happens when a visitor mouses over an image - options include showing a title overlay, a colour tint, zoom, or a combination. Choose what fits your content.
- Items per row: For Grid and Masonry layouts, you can set how many columns appear on desktop and adjust separately for mobile.
Step 6: Organise and Add Captions

In the media manager, drag images to reorder them. The gallery will display items in the order you set here. To add a caption to an individual image:
- Click the image in the media manager.
- In the image settings panel, enter a Title (shown as the image heading) and Description (shown as caption text below the title).
- In the gallery's Design settings, turn on Show Title and/or Show Description under the hover or overlay options.
Captions are useful for portfolios and photography galleries where context adds value - for example, naming a photograph or noting the location where it was taken.
Step 7: Publish Your Website

Once you are satisfied with the gallery, click Publish in the Wix Editor. Visit the live page and test the gallery on both desktop and a mobile device to confirm images load correctly and the layout responds properly to different screen sizes.
Tips for Getting the Most from Wix Pro Gallery
- Optimise images before uploading: Even though Wix compresses images on upload, starting with optimised files (80% quality JPG, reasonable file size) keeps load times fast.
- Use consistent aspect ratios in a Grid layout: If you mix portrait and landscape images in a Grid, Wix will crop them to fit - sometimes cutting off important parts. Either use Masonry (which preserves ratios) or crop your images to a uniform ratio before uploading.
- Check mobile layout separately: The number of columns and the image size that looks right on desktop may not work on mobile. Use the mobile editor preview to check and adjust items-per-row for smaller screens.
- Name your images for SEO: Wix Pro Gallery images can be given alt text via the media manager. Add descriptive alt text to each image - this helps Google understand what the gallery contains and improves accessibility.
- Use a Slideshow for hero sections: If you want a full-width rotating banner at the top of your page, a Pro Gallery in Slideshow layout is a clean way to achieve this without a separate app.
Wix Pro Gallery and SEO: How to Get Your Images Found
Google can index images from a Pro Gallery, but only if those images have proper alt text and descriptive filenames. Most Wix users skip both, which means their gallery images never appear in Google Image search and contribute nothing to the page's relevance signals.
Alt text: Add a description to every gallery image through the Wix Media Manager. Click the image, find the "Alt Text" field, and write a specific description. "London wedding photography at Southwark Cathedral 2024" is useful. If you are building a wedding-themed site on Wix, our roundup of the best Wix wedding website templates covers the top options with RSVP and registry support. "photo1" is not. Alt text also improves accessibility for visitors using screen readers.
Image file names: Wix stores uploads using their original filenames. Before uploading, rename files descriptively. "portrait-photographer-edinburgh.jpg" tells Google something useful. "DSC_0042.jpg" tells it nothing. This takes a few extra minutes before uploading but makes a real difference for image search visibility.
Page speed: Wix Pro Gallery lazy-loads images by default, so having 50 images in a gallery does not significantly hurt your initial page load time. Only the images visible in the viewport load first. However, very large individual image files still slow the first visible item. Keep individual images under 1MB where possible, and avoid uploading images wider than 2500px unless you specifically need that resolution.
Structured data: Wix does not automatically add ImageGallery structured data to Pro Galleries. If you want your gallery to appear in Google's rich results for image-heavy searches, you would need to add schema markup manually through the HTML/head code settings in your Wix dashboard. This is an advanced step, but it gives galleries on competitive photography and portfolio niches an extra edge in search.
Troubleshooting Wix Pro Gallery Problems
If something goes wrong with your gallery after publishing, here are the most common issues and how to fix them.
"Gallery images show a broken image icon": This usually means the file was deleted from your Wix Media Library after being added to the gallery. Go to the media manager, find the affected image slot, and re-upload the file. The gallery element loses its reference to files that no longer exist in your library.
"Gallery loads slowly": Large image files are the most common cause. Compress your images to under 1MB before uploading and avoid uploading images wider than 2500px. Wix applies its own compression on top, but starting with bloated files means the compressed result is still oversized. Tools like Squoosh or TinyPNG can reduce file sizes significantly without visible quality loss.
"Gallery layout looks different on mobile": The grid column setting you configure in the editor applies to desktop. Switch to the mobile editor in Wix and adjust the items-per-row specifically for mobile under the Pro Gallery settings panel. What looks good in 4 columns on desktop often needs to drop to 1 or 2 columns on a phone screen.
"Hover effects don't show on mobile": Hover effects are touch-based on mobile and behave differently than on desktop. On touch devices, tapping the image triggers the overlay instead of hovering over it. If the tap interaction feels awkward or inconsistent, consider disabling hover effects entirely for mobile and relying on captions shown below the image instead.
"Lightbox doesn't open when I click an image": Check the Pro Gallery settings under Click Action. Make sure it is set to "Open Lightbox" rather than "Do Nothing" or a custom link. If it is already set to Open Lightbox but still not working, check whether a custom link has been applied to individual images in the media manager - per-image links override the global click action setting.
Wix Pro Gallery: Setup Complete
Once your Pro Gallery is live, the main decisions are layout choice and image preparation. Grid works for structured product-style displays; Masonry is best when your images have mixed orientations; Collage suits creative portfolios; and Slideshow is the right pick for a focused, one-at-a-time viewing experience.
If you run into loading issues after publishing, check the total file sizes of your uploaded media and reduce image resolution if needed. Large unoptimised images are the most common cause of slow gallery pages on Wix.
* read the rest of the post and open up an offer