
Adding a donate button to your Wix website gives supporters a direct, low-friction way to contribute to your cause. Whether you run a nonprofit, a charity, or a community project, Wix offers more than one way to collect donations. The built-in PayPal Donate button is the fastest to set up, while third-party apps from the Wix App Market give you more control over the donation experience and reporting.
This guide walks through how to add a PayPal Donate button to your Wix site step by step, then covers the alternative options available through the App Market so you can choose the approach that fits your organization. You'll also find a full walkthrough for setting up recurring donations, tips for tracking donation conversions in GA4, and a troubleshooting guide for when things don't go as expected.
Step-by-Step Guide to Adding a Donate Button on Wix
The PayPal Donate button is built into the Wix Editor and requires no additional apps. You'll need a PayPal Business or Premier account to link it. Here's how to set it up.
Step 1: Click '+' and Select 'Buttons'

In the Wix Editor, click the '+' icon to open the Add Elements panel. Select 'Buttons' to see all available button types you can place on your page.
Step 2: Select 'PayPal Buttons'

Within the Buttons panel, scroll to the 'PayPal Buttons' section. You'll find two pre-designed donate button options connected to the PayPal payment platform. Select 'PayPal Donate' to place it on your page.
Step 3: Set Up Your PayPal Donate Button

Click on the button in the Wix Editor and select 'Add PayPal Info'. Specify that the button is for 'Donating', then fill in your PayPal email address, the purpose of the donation (optional, but it appears on the PayPal checkout page), and whether you want a fixed amount or to let visitors choose their own. Fixed amounts work well for campaigns with a clear goal. Open amounts work better for general support pages where donors decide how much they can give.
Step 4: Choose Your Donate Button Layout
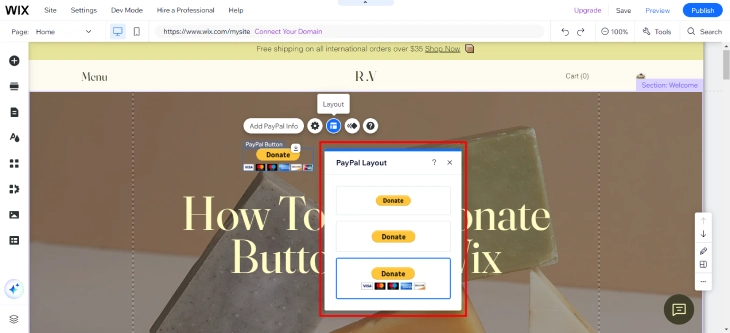
Wix offers a range of layout presets. Some display accepted payment card logos alongside the donate text, while others use a cleaner minimal design without card icons. Pick the layout that best fits your site's visual style. After choosing, drag the button to a prominent position on your page. Placing it above the fold or immediately after explaining your cause tends to produce the best conversion results.
Other Ways to Accept Donations on Wix
The PayPal Donate button is quick but limited. It doesn't support recurring donations, donor records, or Stripe. If your organization needs more from its donation setup, the Wix App Market has dedicated apps that fill these gaps.
Donation Apps from the Wix App Market
Apps like Donorbox, Stripe Donations, and similar tools can be added directly from the Wix App Market (click 'Add Apps' in the Wix Editor to open it). These apps typically offer:
- Recurring donations: let supporters commit to monthly or annual contributions rather than one-time gifts
- Donor management: track who donated, when, and how much, from within the app's dashboard
- Stripe support: accept donations via Stripe in addition to PayPal, giving donors more payment options
- Custom donation forms: add a name, message, or campaign designation to each donation
- Donation receipts: automatically email tax-receipt confirmations to donors after each transaction
These apps involve a subscription cost or per-transaction fee on top of PayPal or Stripe's standard processing fees. Compare the options in the App Market before installing, as pricing and features vary between providers.
Wix Payments for Collecting Contributions
If your country supports Wix Payments, you can create a simple order or payment form to collect fixed contributions without PayPal. This approach routes funds through Wix Payments directly rather than a third party. It's not a dedicated donation tool, but it works well for small organizations that want everything inside Wix rather than sending donors to PayPal. The trade-off is fewer donation-specific features: no recurring billing, no donor receipts, no campaign tracking.
How to Set Up Recurring Donations on Wix
One-time donations are valuable, but recurring donors are the backbone of sustainable fundraising. Recurring donors give 42% more over the course of a year than one-time donors, according to data from the Fundraising Effectiveness Project. The built-in PayPal Donate button doesn't support recurring billing, so you'll need a dedicated app from the Wix App Market to offer this option. Donorbox is the most widely used choice and integrates directly with Wix.
Step 1: Install Donorbox from the Wix App Market
In your Wix Editor, click 'Add Apps' in the left panel to open the Wix App Market. Search for "Donorbox" and click 'Add to Site'. You'll be prompted to create a Donorbox account (or log into an existing one) before the app connects to your site. Donorbox offers a free tier that covers the basics, with paid plans unlocking features like custom receipts, advanced analytics, and Salesforce integration.
Step 2: Create a Donation Campaign in Donorbox
After connecting your account, open the Donorbox dashboard (accessible from the app panel in your Wix Editor or directly at donorbox.org). Click 'New Campaign' and fill in:
- Campaign name: something clear and descriptive, such as "Support Our Annual Fund" or "Emergency Relief Fund"
- Currency: select the currency your donors will be giving in
- Campaign goal: optional, but a visible progress bar increases donations by showing social proof
- Description: a brief paragraph explaining what the donations will fund
Step 3: Enable Monthly and Annual Recurring Options
Inside your campaign settings, look for the 'Recurring Donation' section. You can set recurring as optional (donors choose between one-time and recurring), or you can make it the default option. The recommended approach for most organizations is to set recurring as the default and let donors opt down to a one-time gift. This framing consistently increases the percentage of recurring sign-ups without reducing overall donations.
You can offer monthly and annual frequencies. Monthly is more common for individual donors. Annual works well for corporate or major gift supporters who prefer a single annual transaction. Enable both so donors can choose whichever fits their budget.
Step 4: Embed the Donorbox Form on Your Wix Page
From the Wix Editor, open the Donorbox app widget and select the campaign you just created. The widget will appear as an embeddable form on your page. Drag it to the desired location (above the fold on a dedicated Donate page is the standard placement). Resize the widget to fit your layout.
Donorbox forms are responsive by default, so they adapt to mobile screens without additional configuration. Before going live, check the form on your mobile editor view to confirm it renders correctly on small screens.
Step 5: Test a Recurring Donation
Donorbox provides a test mode for verifying your setup before real donors use it. In your Donorbox dashboard, switch your payment processor (Stripe or PayPal) to test mode. Then visit your Wix page, submit a test donation using Stripe's test card numbers (available in Stripe's documentation), and select a recurring frequency. Check your Donorbox dashboard to confirm the donation appears as a recurring entry and that the receipt email sends correctly. Switch back to live mode before publishing.
Where to Place Your Donate Button for Best Results
The button itself is straightforward to add. Where you place it determines how many people actually click it.
- Homepage hero section: visitors see it immediately without scrolling. Best for organizations where donation is the primary call to action. Research by the Nielsen Norman Group shows that content above the fold receives 57% more attention than content below it.
- Dedicated donations page: give the cause its own page with a full explanation, impact stats, and the button. Link to this page from your navigation menu so it's reachable from every page on your site.
- Sidebar or sticky header: keeps the donate option visible as visitors browse other content on your site, without interrupting the reading experience.
- After impact stories or testimonials: placing the button immediately after a compelling story or result converts better than a button at the top of the page before context is established. Donors give when they feel something, not before.
- Footer: a secondary placement for visitors who scroll to the bottom before deciding to donate. Don't rely on the footer alone, but always include it as a fallback.
Beyond placement, button color makes a measurable difference. A button in a color that contrasts with the surrounding page (rather than blending into the background) can increase click-through rates by 20 to 30%, based on A/B testing studies by CXL Institute and others. If your site uses white and blue, an orange or green donate button will stand out more than a matching blue one. Test at least two color options before settling on a final design.
Test different positions and colors by checking your PayPal account's transaction history or using a donation app's analytics to see which page and location drives the most completions.
How to Track Donation Conversions in Google Analytics
Most guides stop at adding the button. Very few cover how to measure whether it's actually working. Without conversion tracking, you're guessing about which traffic source, page, or button position drives real donations. Here's how to set it up properly in GA4.
Set Up a Thank-You Page for Completed Donations
The most reliable way to track donation completions is with a thank-you page. After a donor completes a PayPal transaction, PayPal redirects them to a URL you specify. In your PayPal account settings, set the return URL to a dedicated thank-you page on your Wix site (for example, https://yoursite.com/thank-you-for-donating). Create that page in Wix with a simple confirmation message.
For donation apps like Donorbox, the same principle applies. In your Donorbox campaign settings, find the 'Redirect URL' field and enter your thank-you page URL.
Create a GA4 Conversion Event for the Thank-You Page
Once your thank-you page is live and connected, set up a conversion event in Google Analytics 4:
- In GA4, go to Admin and then Events.
- Click 'Create Event' and name it something like
donation_complete. - Set the condition to match the page_location parameter containing your thank-you page URL (for example, page_location contains
/thank-you-for-donating). - Save the event, then go to Conversions and toggle your new event to mark it as a conversion.
Allow 24 to 48 hours for the conversion to appear in your reports after the first test transaction.
What to Look for in Your Reports
Once conversions are tracking, the most valuable report is the Acquisition overview. This shows how many donations came from each traffic source (organic search, social, direct, email). This tells you which channel is actually driving donors, so you can put more effort into it.
Check the Landing Page report as well. If your homepage generates far more donations than your dedicated donate page, that's useful information about where donors prefer to give. If a blog post about your mission drives conversions, link the donate button more prominently from that post.
Segment by device type too. Mobile users behave differently from desktop visitors on donation forms. If mobile has a high page view rate but low conversion rate, the form may be difficult to complete on small screens, which is a fixable technical problem rather than a donor motivation problem.
Wix Donate Button Not Working: Common Fixes
Most problems with Wix donation buttons fall into a small number of categories. Here's what to check before spending time troubleshooting deeper issues.
PayPal Button Not Appearing After You Publish
If you added the PayPal Donate button in the Wix Editor but it doesn't show up on the live site after publishing, the most common fix is to republish the page. In the Wix Editor, click 'Publish' again. Wix sometimes caches the previous version of a page and requires a fresh publish to update. If republishing doesn't fix it, try clearing your browser cache and reloading the live URL. Also check that the button isn't hidden on mobile by viewing your page in the Wix mobile editor.
PayPal Account Not Linked Correctly
If the button appears but clicking it shows an error on PayPal's side (such as "This recipient is currently unable to receive money"), the PayPal email address linked to the button doesn't match an active PayPal account, or the account type is incorrect. PayPal requires a Business or Premier account for Donate buttons. A Personal account won't work. Double-check the email address in the PayPal button settings inside the Wix Editor by clicking the button and selecting 'Edit PayPal Info'.
Donations Going to the Wrong PayPal Account
If you've updated your PayPal email address and donations are still going to an old account, it's because the Wix button is still linked to the old email. Go into the Wix Editor, click the PayPal Donate button, select 'Edit PayPal Info', and update the email address to your current PayPal account. Publish the change and verify with a small test donation.
Button Visible on Desktop but Not on Mobile
Wix has separate layouts for desktop and mobile. An element can be hidden on one view and visible on the other without you realizing it. In the Wix Editor, switch to mobile view using the phone icon at the top of the editor. If the donate button doesn't appear in mobile view, it has been set to hidden for mobile. Click the button (or find it in the layers panel) and toggle its mobile visibility to show.
Donation Amount Not Updating
If you set a fixed donation amount in the button settings and donors are being charged a different amount (or no amount is pre-filled), verify the amount setting in 'Edit PayPal Info'. Note that PayPal Donate buttons with fixed amounts still allow donors to change the amount on the PayPal checkout page before completing the transaction. This is a PayPal behavior, not a Wix limitation. If you need to enforce a specific amount without letting donors change it, use a donation app like Donorbox with a fixed-tier campaign instead.
How To Add Donate Button On Wix: Summary
The fastest way to add a donate button to Wix is through the built-in PayPal Buttons option in the Add Elements panel. It takes under 5 minutes and requires no additional apps. For more advanced needs like recurring donations, Stripe support, or donor management, install a dedicated app like Donorbox from the Wix App Market. Set up a thank-you page redirect and a GA4 conversion event so you can measure which traffic sources actually produce donations rather than just page visits. Place your button where visitors are already engaged with your cause, use a contrasting color to make it stand out, and check the troubleshooting section above if the button isn't behaving as expected.
For a full overview of all button types available in Wix, including styled buttons, anchor links, lightbox triggers, and phone number links, see our guide on how to add a button on Wix.
* read the rest of the post and open up an offer