
A QR code links any printed or physical material straight to your Wix website. Someone scans the code with their phone camera, and your site opens instantly. No typing a URL, no searching. If you run a business, event, or portfolio on Wix, a QR code gives people a fast path from a flyer, menu, or business card to your online content.
This guide walks you through every step: picking a QR code generator, creating and customizing your code, adding it to your Wix site, and testing it on real devices. You will also learn the difference between static and dynamic QR codes, how to track scans with UTM parameters and Google Analytics, where to use QR codes for specific Wix features like Bookings and Events, and design tips that keep your code scannable.
Static vs Dynamic QR Codes: Which One Should You Use?
Before you generate anything, it helps to understand the two main types of QR codes. The type you choose affects whether you can edit the link later and whether you can track scan data.
Static QR Codes
A static QR code has the destination URL baked directly into its pattern. Once created, the link cannot be changed. If you need to point to a different page later, you have to generate a brand-new code and replace the old one everywhere it appears.
Static codes work best when:
- The URL will never change (e.g., your homepage)
- You do not need scan analytics
- You want a code that works even if the generator service goes offline
Dynamic QR Codes
A dynamic QR code routes through a short redirect URL. You can log into the generator's dashboard and swap the destination anytime without changing the printed code. Most dynamic code services also provide scan tracking: how many scans, when, and from which locations.
Dynamic codes are a better fit when:
- You plan to run seasonal promotions or update landing pages
- You want to track how many people scan the code
- You are printing the code on materials that are expensive to reprint (packaging, signage)
Best QR Code Generators for Wix Sites
You can create a QR code for your Wix website with several free and paid tools. Here are four reliable options:
- Wix QR Code Generator - Built into Wix's tools page. Free, simple, and connects to your Wix account. Good for basic static codes with brand color customization.
- QR Code Generator (qr-code-generator.com) - Offers both static and dynamic codes. The free plan covers static codes; paid plans add tracking and editable URLs.
- QRCode Monkey - Completely free with no scan limits. Supports custom colors, logo embedding, and high-resolution PNG/SVG/EPS downloads. Static codes only.
- Canva - If you already design marketing materials in Canva, its built-in QR code generator lets you add a code directly to your flyer, poster, or business card design.
Step-by-Step: Generate a QR Code for Your Wix Website
The steps below use the Wix QR Code Generator, but the process is similar with any tool. Paste your Wix page URL, customize, download, and upload.
Step 1: Log Into Your Wix Account
Go to Wix and sign in. If you do not have an account yet, sign up with your email or a social login. Already logged in? Skip ahead to Step 2.
Step 2: Open the QR Code Generator

Head to the Wix QR Code Generator on the Tools page. This tool is free and creates codes linked directly to any page on your Wix site. If you need dynamic codes with scan tracking, use one of the third-party generators listed above instead.
Step 3: Enter Your URL and Click "Create QR Code"
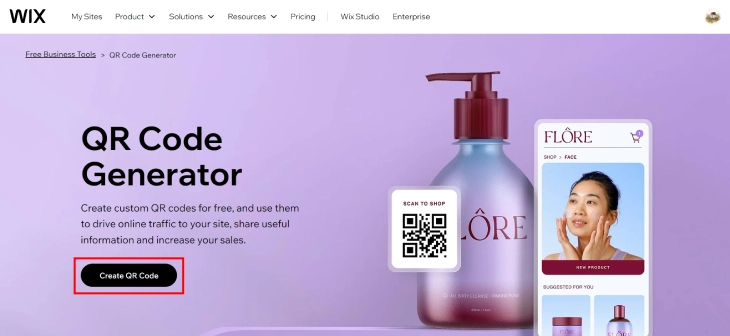
Select "Website URL" as the content type and paste the full URL of the Wix page you want the code to point to. This could be your homepage, a product page, a booking page, or an event listing. Click "Create QR Code" to generate the initial design.
Step 4: Customize the Design

Brand your QR code so it matches your website and marketing materials. Wix lets you adjust:
- Colors - Change the foreground (dot) color to your brand color. Keep the background white or very light for maximum contrast.
- Logo - Add your logo to the center. Keep it small (no more than 30% of the code area) so the code stays scannable.
- Shape and frame - Pick rounded dots or square dots, and add a frame with a call-to-action like "Scan Me."
Design tip: Dark dots on a light background scan best. Avoid inverting the colors (light dots on dark background), as many older phone cameras struggle with that pattern.
Step 5: Download the QR Code

Click "Download" and choose a format:
- PNG - Best for web use and digital screens.
- SVG or EPS - Best for print. These vector formats scale to any size without losing quality.
- JPG - Works for basic use but does not support transparency.
For printed materials like business cards or posters, always download the highest resolution available. A blurry code will not scan reliably.
Step 6: Add the QR Code to Your Wix Website
Open your Wix site in the editor. Decide where you want the code to appear. Common spots include the footer, sidebar, contact page, or a dedicated promotions page. Add an image element, upload your QR code file, and position it where visitors can see it clearly. If you need help placing the image as a clickable element, see our guide on how to add a link in Wix.
Step 7: Test Before Publishing
Testing prevents embarrassing broken codes. Follow this checklist:
- Scan the code with your iPhone's default camera app.
- Scan it with an Android phone's camera or Google Lens.
- Try a third-party scanner app (e.g., QR & Barcode Scanner by Gamma Play).
- Confirm the correct page loads on each device.
- Check that the landing page is mobile-friendly - text is readable, buttons are tappable, and the page loads in under three seconds.
If any scan fails, check the URL for typos, increase the code size, or reduce the logo size so more of the code pattern is visible.
Where to Use Your Wix QR Code
Creating the code is only half the job. Placing it where your audience will actually see and scan it is what drives traffic. Here are practical placements that work:
- Business cards - Print the code on the back, linking to your portfolio or contact page.
- Restaurant menus - Link to an online menu, reservation page, or daily specials update.
- Flyers and brochures - Send readers to a landing page with more details, a signup form, or a discount code.
- Product packaging - Link to setup instructions, warranty registration, or a review request page.
- Email signatures - A small QR code in your email footer gives recipients a quick way to visit your site.
- Event posters and banners - Link to your Wix Events page for RSVPs or ticket purchases.
- Receipts and invoices - Link to a feedback form or loyalty program signup.
You can also add social media icons to your Wix site alongside your QR code to give visitors multiple ways to connect with your brand.
QR Codes for Specific Wix Features
One advantage Wix users have is that many built-in features come with their own dedicated URLs. That means you can generate a QR code for almost any part of your site, not just the homepage. Here is how to pair QR codes with the most popular Wix features.
Wix Bookings - Service providers (salons, coaches, personal trainers, consultants) get the most value out of QR codes pointing directly to their booking page. Copy the URL of your Wix Bookings page, which is typically yourdomain.com/bookings or a specific service URL, and paste it into the generator. Put the resulting code on your business card, waiting room poster, or printed appointment reminder. Clients scan and book without ever having to search for your site.
Wix Events - If you run recurring events, create a fresh QR code for each event's RSVP page and put it on invitations, posters, and table cards. Because each Wix event gets its own URL, static QR codes work fine here. Just generate a new code per event. For an ongoing events calendar page, a single static code pointing to your main events listing saves you the effort of regenerating for every occasion.
Wix Stores - Physical retail locations and pop-up shops can print product-specific QR codes that link directly to individual product pages. This works well for products where customers want to read reviews, see additional photos, or check size guides before buying. Rather than creating one generic code for your store homepage, make a separate code for each product or collection and place it on the shelf tag or display stand next to the item.
Wix Chat and Contact Pages - Put a QR code on printed receipts, shipping inserts, or product packaging that links to your contact or feedback page. Customers who have a question or want to leave a review can scan and reach you without typing anything. This is one of the lowest-friction ways to collect post-purchase feedback, and it keeps your support channel accessible even after the transaction is done.
QR Codes for Wix Blog Posts: Sharing Content at Events and in Print
Most Wix site owners think of QR codes as links to their homepage or booking page. But individual blog posts are one of the most underused QR code targets available. If you speak at events, publish printed newsletters, or hand out business cards to prospects, a QR code pointing to a specific article can do real work for you.
Why Blog Post QR Codes Are Worth Using
A printed handout at a conference has one job: get people to keep engaging with you after you leave the room. Instead of listing your homepage and hoping visitors find the right content, you can print a QR code that drops them directly onto the article you just referenced in your talk. The same logic applies to printed newsletters that tease an article, or a business card where you want a specific prospect to read a piece you wrote that answers their exact problem.
Generating the code is simple. Copy the full URL of the Wix blog post and paste it into any QR code generator. The challenge is what happens next.
Shorten the URL Before Generating
Wix blog post URLs tend to be long. The longer the URL, the denser the QR code pattern, which makes it harder for phone cameras to read accurately. Before generating a code for a blog post, shorten the URL first using a free URL shortener or a short redirect through your own Wix site. A shorter URL produces a cleaner, more scannable code, especially at smaller print sizes.
Link to a Category Page Instead of a Single Post
If you plan to use the same QR code across multiple print runs, consider linking to a blog category page rather than a single post. A category page stays relevant as you add new articles, so a printed brochure from six months ago still points to useful content. For single-use handouts tied to a specific talk or campaign, link directly to the post. For anything printed in bulk and distributed over time, the category page is the safer choice.
NFC Tags: When They Beat QR Codes
NFC (Near Field Communication) tags are worth knowing about as an alternative. Instead of scanning with a camera, a user taps their phone against a small embedded tag. NFC works at very close range and requires no camera, which makes it a better fit for product packaging, shelf displays, or any situation where the customer is already holding the item in their hands. The tradeoff: NFC tags cost more to produce than printed QR codes, and they only work on NFC-enabled phones with the feature turned on. For most printed marketing materials, conference handouts, and newsletters, a QR code is the more practical and affordable option.
QR Code Design Tips for Better Scans
A QR code that looks good but does not scan is useless. Keep these rules in mind when customizing:
Maintain High Contrast
The dots (modules) should be much darker than the background. Black on white is the safest choice. If you use brand colors, test the code immediately - some color combinations look fine to the eye but confuse camera-based scanners.
Respect the Quiet Zone
Every QR code needs a blank margin around it (called the quiet zone). This margin should be at least four modules wide. Do not crop the code or place it flush against other design elements.
Choose the Right Error Correction Level
QR codes have four error correction levels: L (7%), M (15%), Q (25%), and H (30%). Higher levels mean the code can still scan even if part of it is obscured - for example, by a logo in the center. If you add a logo, set error correction to at least Q or H.
Minimum Print Size
For printed materials, the QR code should be at least 2 x 2 cm (roughly 0.8 x 0.8 inches). For scanning from a distance (posters, banners), increase the size proportionally. A good rule: the code should be about one-tenth of the expected scanning distance.
A QR code is one practical way to share your Wix site offline, but there are several other methods available. For the full picture, see our guide on ways to share your Wix website link - including preview links, social sharing, and collaborator access.
Best Practices for QR Codes on Your Wix Site
Follow these guidelines to get the most out of your QR code integration:
Place the Code Where It Makes Sense
On your website, put the QR code on pages where visitors might want to save or share the link offline: your contact page, event page, or a special offer page. Avoid cluttering your homepage with a code that links back to itself.
Add a Call-to-Action
Never assume people know what the code does. Add a short line of text near the code: "Scan to book an appointment," "Scan for 10% off," or "Scan to see our full menu." A clear prompt increases scan rates significantly.
Keep the Landing Page Mobile-First
Since every QR scan happens on a phone, the destination page must work perfectly on small screens. Check that text is large enough to read, forms are easy to fill out, and the page loads quickly on a cellular connection.
Track Performance
If you use a dynamic QR code, check your scan analytics regularly. Look at total scans, unique scans, time of day, and location data. This tells you which offline placements are actually driving traffic so you can double down on what works.
Update When Needed
If you change the URL structure of your Wix site or take down a landing page, update your dynamic QR code destination immediately. A code that leads to a 404 error page wastes the effort you put into printing and distributing it.
Common QR Code Mistakes Wix Site Owners Make
Most QR code problems show up after printing. The code looked fine on screen, but in the real world it fails to scan, sends people to the wrong place, or simply gets ignored. These are the most common mistakes to avoid.
1. Printing Too Small
A QR code smaller than 2 cm x 2 cm is unreliable for most phone cameras. The denser the code (more data, longer URL), the larger it needs to be. Fix: Set a minimum print size of 2.5 cm x 2.5 cm and go larger whenever space allows.
2. Linking to a Page That Is Not Mobile-Optimized
Every single scan of your QR code happens on a phone. If the destination page is slow to load, hard to read on a small screen, or requires horizontal scrolling, you will lose that visitor immediately. Fix: Before finalizing any QR code, open the destination URL on your own phone and check that it loads quickly and looks correct.
3. Displaying a QR Code on a Digital Screen
Putting a QR code on a website, email, or presentation slide and expecting people to scan it is a mistake. Nobody can scan their own screen, and holding a second device up to scan a laptop or phone screen is frustrating. Fix: On digital surfaces, use a regular clickable hyperlink or a social sharing button instead. QR codes belong in physical contexts where a link cannot be clicked.
4. Wrong Color Contrast
QR codes need dark dots on a light background. Reversing the contrast (light dots on a dark background) fails on many phone cameras. Placing the code over a busy background pattern also causes read errors. Fix: Always use a dark code on a solid white or very light background. If you want color, apply it to the dots only, not the background.
5. No Call-to-Action Near the Code
A QR code with no label is a black box. People will not scan something if they do not know what will happen when they do. Fix: Always add a short line of text near the code that tells people what they will get. For example: "Scan to book your appointment" or "Scan to read the full guide."
6. Linking to the Homepage Instead of a Specific Page
When someone scans a QR code on a product, a flyer, or a business card, they have a specific intent. Dropping them on a generic homepage makes them hunt for what they came for. Fix: Link to the most relevant page for the context where the code appears. A code on a product card should link to that product page. A code on a booking flyer should link to the booking page.
7. Using a Static Code for a URL That Will Change
Static QR codes cannot be updated after printing. If the destination URL changes (a seasonal offer expires, an event page comes down, a slug gets renamed), the printed code becomes a dead link. Fix: Use a dynamic QR code for any destination that might change. Dynamic codes let you update the destination URL without reprinting.
8. Never Testing After Printing
A QR code that scans perfectly as a digital file can fail after being exported as a JPEG and processed through a print workflow. Compression artifacts, color shifts, and scaling during layout can all introduce errors. Fix: Always test the final printed output (or a high-resolution proof) with at least two different phone cameras before distributing. Do not rely on a digital-only test.
Using UTM Parameters With Your Wix QR Code
UTM parameters are short tags you add to the end of a URL to tell Google Analytics where a visitor came from. For QR codes, they solve a specific problem: without them, every scan shows up in your analytics as "direct" traffic, which tells you nothing about which printed material drove the visit. Add UTM parameters before you generate the code, and you can see exactly how many people scanned a business card versus a flyer versus a product insert.
Adding UTM tags is straightforward. Before you paste your URL into the QR code generator, append the parameters to the end. A typical format looks like this: https://yourdomain.com/bookings?utm_source=qr&utm_medium=print&utm_campaign=businesscard. The three values you control are the source (where the code is physically located, such as "qr"), the medium (the format, such as "print" or "packaging"), and the campaign (the specific piece of material, such as "businesscard" or "summerflyer"). That URL becomes the destination encoded into your QR code.
Here are naming conventions that keep your analytics tidy across different placements:
- Business cards:
?utm_source=qr&utm_medium=print&utm_campaign=businesscard - Flyers:
?utm_source=qr&utm_medium=print&utm_campaign=flyer_spring2026 - Product packaging:
?utm_source=qr&utm_medium=packaging&utm_campaign=productname - Event banners:
?utm_source=qr&utm_medium=print&utm_campaign=eventname_2026 - Receipts:
?utm_source=qr&utm_medium=receipt&utm_campaign=feedback
This approach works with static QR codes and requires no paid analytics service - just a free Google Analytics account connected to your Wix site. You are not relying on the QR generator's dashboard at all. The tracking happens on your end, in your own analytics account, and the data stays yours regardless of which generator you used.
One thing to watch: UTM parameters make your URL longer, and very long URLs can cause QR codes to become denser and harder to scan. If your base URL is already long (for example, a specific product page with a long slug), add a URL shortener step between tagging and generating. Shorten the UTM-tagged URL first with a service like Bit.ly, then paste the short link into the QR code generator. The code will be simpler, scan more reliably, and still pass the UTM data through to your analytics.
To view your results in Google Analytics 4, go to Reports, then Acquisition, then Traffic Acquisition. In the session source/medium breakdown, look for rows where the source is "qr." You can also add a secondary dimension for "Session campaign" to see which specific materials are performing. Check this data a few weeks after distributing printed materials to see which placements are worth repeating and which ones are not generating scans.
* read the rest of the post and open up an offer