
Having a reliable payment system is essential for any Wix store owner. It lets customers pay securely and quickly, which directly affects conversions and repeat purchases. Wix Payments is built into the Wix platform, which means you skip third-party integrations entirely: you get transparent fees, built-in fraud protection, and payouts deposited within 2 to 5 business days.
Setting up Wix Payments takes most merchants under 30 minutes. Click Accept Payments in your Wix dashboard, choose your payment methods, review the prohibited products list, and fill in your business and banking details. This guide covers every step, plus tax configuration, a pre-launch checklist, and a comparison of Wix Payments against Stripe and PayPal so you can decide which processor fits your business best.
For nonprofits and mission-driven organizations, you can also add a donate button on Wix through the built-in PayPal Buttons integration, which works without a Wix Payments account.
Wix Payments Transaction Fees
Before you set up Wix Payments, understand exactly what you'll pay per transaction. Wix Payments charges 2.9% + $0.30 per online credit or debit card transaction. There are no additional monthly gateway fees on top of your Wix Business or eCommerce plan. For a full breakdown of what each eCommerce plan includes beyond payments, see our Wix eCommerce review.
In-person transactions via Wix POS are charged at a lower rate of 2.6% + $0.10 per tap, dip, or swipe. Manual card entry for in-person payments costs 3.5% + $0.15.
For a full breakdown of how these fees compare against third-party processors, see our guide on understanding Wix payment fees. You can also check whether Wix takes a percentage of sales beyond the standard processing rates. If you plan to use Wix Payments with a card reader, our Wix POS system review covers hardware setup, pricing, and feature details.
Is Wix Payments Available in Your Country?
Wix Payments is not available everywhere. Before spending time on setup, confirm that your country is supported. As of 2026, Wix Payments is available in:
- United States
- United Kingdom
- Canada
- Australia
- Ireland
- Germany
- France
- Spain
- Italy
- Netherlands
- Belgium
- Austria
- Switzerland
- Sweden
- Denmark
- Finland
- Norway
- Poland
- Czech Republic
- Latvia
- Lithuania
- Estonia
- Brazil
- Singapore
- Japan
If your country isn't listed, connect a third-party payment provider like Stripe, PayPal, or Square through your Wix dashboard instead. See our comparison of Wix Payments vs Stripe to understand which option suits your business better.
Accepted Payment Methods on Wix
Wix Payments supports a wide range of payment methods to give your customers flexibility at checkout:
- Credit and debit cards: Visa, Mastercard, American Express, and Discover
- Digital wallets: Apple Pay, Google Pay, and Tap to Pay on iPhone (where available)
- Buy now, pay later: Afterpay/Clearpay (available in the US, UK, Australia, and Canada)
- Local bank transfers: iDEAL (Netherlands), Giropay (Germany), Bancontact (Belgium), and other region-specific methods
- PayPal: Connect PayPal as a separate gateway alongside Wix Payments
The payment methods available to your customers depend on your business location. You can enable or disable individual payment methods from the Accept Payments section of your Wix dashboard at any time.
How to Set Up Wix Payments
Setting up Wix Payments requires just a few steps. Completing them fully and accurately matters: incomplete setup leads to payment holds or delayed payouts.
Step 1: Click 'Automations' on Your Wix Dashboard
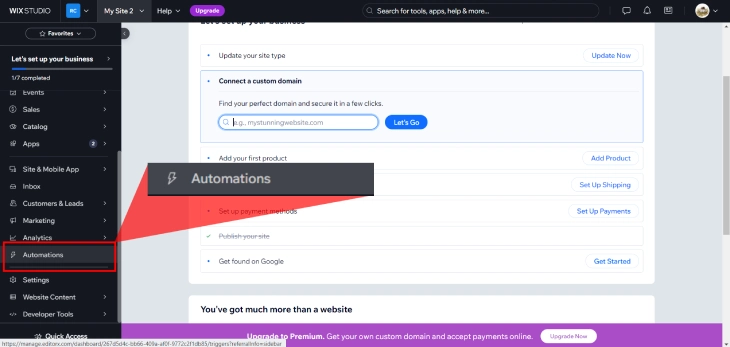
Log in to your Wix account and open your site's dashboard. In the left-hand menu, click Automations. This section connects Wix's business tools (including payment processing) and is the starting point for activating Wix Payments.
Step 2: Click 'Accept Payments'

Within the Automations area, click Accept Payments. This opens the payment setup interface where you can enable and configure payment methods for your store.
Step 3: Click 'Set Up' for Wix Payments

You'll see a list of available payment providers. Click the Set Up button next to Wix Payments to begin the activation process. This starts a guided flow that walks you through each required step.
Step 4: Select Payment Methods to Accept

Choose which payment methods you want to accept. At a minimum, enable credit and debit cards. You can also toggle on digital wallets (Apple Pay, Google Pay) and buy-now-pay-later options. You can add or remove methods later from the Accept Payments settings.
Step 5: Review and Agree to Wix Payments Terms

Review the list of prohibited products and services. Wix Payments cannot be used for certain categories including firearms, adult content, and regulated financial products. Read the terms carefully and check the agreement box to proceed.
Step 6: Complete the Business and Payout Information Form

Fill in your business details: legal business name, business type (sole proprietor, LLC, etc.), registered address, and EIN or SSN (for US merchants). Then add your bank account details for payouts, including your account number and routing number.
Double-check everything before submitting. Errors in your banking information can delay your first payout by several business days while Wix verifies the corrected details.
Step 7: Enable Your Automation

After submitting your business information, return to the Automations panel and confirm that payment processing is toggled on. Your first transaction can take 1 to 3 business days to be verified after setup. Once approved, payments process immediately and payouts begin on the standard schedule.
Configuring Tax Settings in Wix Payments
Tax setup is one of the most overlooked steps in a Wix Payments configuration. Getting it wrong means either overcharging customers or failing to collect what you owe. Wix has a built-in tax module that works alongside Wix Payments, and the settings differ significantly depending on whether you're selling in the US, the EU, or internationally.
US Sales Tax: Manual Rates vs Automatic Calculation
US sales tax is destination-based in most states, meaning the rate depends on where your customer is located. Wix gives you two options: set manual tax rates by state, or connect Avalara (Wix's automated tax partner) for real-time rate calculations.
Manual rates work fine if you only have tax obligations (nexus) in one or two states. If you've crossed economic nexus thresholds in multiple states (typically $100,000 in sales or 200 transactions per state per year), automated calculation saves significant time and reduces the risk of filing errors.
To configure tax in Wix:
- Go to Settings in your Wix dashboard.
- Click Tax under the Store section.
- Add a tax region for each state where you have nexus.
- Enter the applicable rate or enable automatic tax calculation.
VAT for EU Sellers
If you're based in the EU or sell to EU customers, you need to configure VAT in Wix. EU VAT rates vary by country and by product category (standard rate, reduced rate, or zero-rated). For example, Germany's standard VAT rate is 19%, France's is 20%, and Ireland's is 23%.
Wix lets you add VAT rates per country and per product category. You can also configure whether your listed prices are tax-inclusive (the customer sees the final price) or tax-exclusive (tax is added at checkout). Most EU retailers display tax-inclusive prices to comply with consumer pricing regulations.
If you sell digital goods to EU consumers from outside the EU, the OSS (One Stop Shop) scheme applies. Register in one EU country and file a single quarterly VAT return covering all EU sales rather than registering separately in every country you sell to.
Tax-Inclusive vs Tax-Exclusive Pricing
This setting has a direct impact on how prices appear in your store and at checkout. Tax-inclusive pricing means the price your customer sees already contains tax. Tax-exclusive pricing means tax is added on top at checkout, which can surprise customers if not clearly communicated.
For US merchants, tax-exclusive is the norm. For UK and EU merchants, tax-inclusive is standard and often legally required for consumer-facing pricing. Change this setting in your Wix Tax settings under Display Prices.
Wix Payments vs Stripe vs PayPal: Which Should You Use?
Many Wix store owners default to Wix Payments simply because it's built in. That's often the right call, but it's worth understanding where Wix Payments falls short compared to Stripe and PayPal, and when switching (or adding a secondary processor) makes sense.
Fee Comparison
- Wix Payments: 2.9% + $0.30 per transaction online; 2.6% + $0.10 in person
- Stripe: 2.9% + $0.30 per transaction online; 2.7% + $0.05 in person
- PayPal: 3.49% + $0.49 per transaction (standard); lower rates available on higher volume plans
Wix Payments and Stripe are priced identically for online transactions. PayPal is more expensive at standard rates, though some customers prefer it for the buyer protection it offers.
Payout Speed
- Wix Payments: 2 to 5 business days (standard)
- Stripe: 2 business days (standard); instant payouts available for an additional 1.5% fee
- PayPal: Instant to PayPal balance; 1 to 3 business days to bank account
If cash flow speed matters, PayPal's instant-to-balance transfer can help, though you'll still wait to move funds to your bank. Stripe's instant payout option is the fastest route directly to a bank account.
Country Coverage
- Wix Payments: 25 countries (as of 2026)
- Stripe: 46+ countries
- PayPal: 200+ countries
If your business is in a country not on the Wix Payments list, Stripe is usually the better alternative. PayPal has the widest global reach but also the highest fees.
When to Use Each
- Use Wix Payments if your country is supported and you want the simplest setup with everything managed from one dashboard.
- Use Stripe if you need lower payout times, more advanced fraud rules, or if you're in a country Wix Payments doesn't cover.
- Add PayPal as a secondary processor if your customers actively request it. Many buyers trust PayPal for the buyer protection it provides, so offering it alongside Wix Payments can reduce checkout abandonment without replacing your primary processor.
You can run Wix Payments and PayPal simultaneously from your Wix dashboard. Stripe replaces Wix Payments rather than running alongside it.
Before You Go Live: Wix Payments Checklist
Before accepting real customer payments, work through this checklist. Each item addresses a common failure point that causes problems after launch.
- Run a test transaction. Place a real order with a real card and then refund it. This confirms your payment processing, order confirmation emails, and refund workflow all function correctly end to end.
- Verify your bank account. Wix sends a micro-deposit to verify your payout account. Confirm that it arrived and that you've validated it in your Wix Payments settings. Unverified accounts delay your first real payout.
- Check payout notification emails. Make sure payout notification emails are going to an address you monitor. Missed notifications can mean you don't catch a problem until you notice missing funds.
- Review your fraud filter settings. Wix Payments has a built-in fraud filter. Check the settings in your Wix Payments dashboard and adjust the sensitivity level based on your product type. Physical goods with high fraud risk (electronics, gift cards) warrant stricter settings than low-risk services.
- Confirm SSL is active. Your Wix site automatically gets an SSL certificate, but confirm the padlock shows in your browser before sending traffic. Customers will not enter card details on an unsecured page.
- Publish a clear refund and returns policy. Your refund policy should be linked in your footer and on your checkout page. This reduces chargebacks because customers know how to get help directly from you rather than disputing with their bank.
- Check tax settings for your region. Confirm that the correct tax rates are configured and that tax is displaying correctly at checkout. A test order will show you the final checkout total including tax.
- Complete your business verification. Wix Payments holds payouts if your business information form isn't complete within 30 days of your first transaction. Complete the form before your first sale, not after.
How to Handle Refunds Through Wix Payments
Wix Payments lets you issue refunds directly from your dashboard without contacting Wix support. You can refund full orders or partial amounts in just a few clicks.
To issue a refund:
- Go to your Orders section in the Wix dashboard.
- Click on the order you want to refund.
- Select Refund and choose whether to refund the full amount or a partial amount.
- Confirm the refund. Wix processes it immediately, and the funds typically appear in the customer's account within 5 to 10 business days, depending on their bank.
Refunds are deducted from your next payout. If the refund amount exceeds your available balance, Wix debits the difference from your bank account on file. It's worth maintaining a small balance buffer if you operate in a high-return category.
How to Manage Chargebacks with Wix Payments
A chargeback occurs when a customer disputes a charge with their bank rather than requesting a refund through you. Chargebacks are a normal part of running an online store, but they carry fees and affect your account standing if they happen frequently.
When a chargeback is filed:
- Wix notifies you by email and flags the order in your dashboard.
- You have a response window (typically 7 to 10 days) to submit evidence that the transaction was legitimate.
- Useful evidence includes: order confirmation emails, delivery tracking information, screenshots of communication with the customer, and proof of the customer accessing digital products.
- Wix submits your evidence to the card network for review. The process takes 30 to 75 days to resolve.
Wix charges a chargeback fee of approximately $20 per dispute. This fee is non-refundable even if you win the dispute. To reduce chargebacks, use clear product descriptions, send order confirmation emails promptly, and respond to customer complaints quickly before they escalate to their bank.
Troubleshooting Wix Payments Setup Problems
Most Wix Payments setup issues fall into a handful of predictable categories. Here's how to handle the most common ones.
Wix Payments Not Available in My Region
If your country isn't on the supported list, Wix Payments isn't an option for your account. Connect a third-party payment processor instead. Stripe and PayPal both integrate directly with Wix and cover most countries worldwide. Go to Accept Payments in your dashboard, select the provider you want, and follow the connection steps. You'll still be able to accept all major cards and digital wallets through these processors.
Setup Keeps Asking Me to Verify Again
Identity verification is handled by Wix's banking partner, not Wix itself. If the system keeps prompting you to re-verify, it usually means your submission is still under review rather than rejected. Allow 2 to 3 business days for the verification to complete before assuming something went wrong. If the prompt persists beyond that window, contact Wix support directly and reference your account email so they can check the status with their payments team.
Payments Are on Hold
Wix places payments on hold when the business payout form hasn't been completed within 30 days of your first transaction. If this happens, log in to your dashboard and complete the payout form immediately. Once submitted and verified, held funds are released on the next standard payout cycle. Complete the full setup before you start accepting payments to avoid this entirely.
Customers Report Payment Declining
Declines at checkout are often card-specific rather than a problem with your Wix setup. First, check which card types are supported for your country, as not all networks are available in every market. Then ask the customer to try a different card or switch to a digital wallet like Apple Pay or Google Pay. If declines are happening across multiple customers and card types, check your Wix Payments dashboard for any account alerts or holds that might be blocking transactions.
Your Wix Payments Setup: What Comes Next
Once Wix Payments is active and you've verified your bank account, worked through the pre-launch checklist, and confirmed your tax settings are correct, you're ready to accept real orders. The setup process is genuinely quick; most of the time spent is on the business verification form, which Wix requires to comply with financial regulations.
If Wix Payments isn't available in your country or doesn't cover all the payment methods your customers prefer, connecting Stripe or PayPal as an alternative gives you broader coverage. For help choosing the right processor, see our detailed comparison of Wix Payments vs Stripe. With payments configured, the next step is setting up your delivery options - our guide on how to set up Wix shipping covers regions, flat and weight-based rates, and carrier integrations.
* read the rest of the post and open up an offer