

A Wix lightbox is a popup overlay that appears on top of your page content to deliver a focused message: a discount offer, newsletter signup, age verification, or product spotlight. Unlike a full page redirect, the background stays visible but dimmed, keeping visitors in context while drawing their attention to what's inside the lightbox.
This guide explains everything about Wix lightboxes, what they are, how to add one, when to use them, and how to get the most from them without frustrating your visitors.
Wix Lightbox: Overview
Lightboxes are interactive overlays that appear on top of your website content, grabbing visitors' attention and delivering focused messages or offers. They can be customized to match your brand's style and used for various purposes, collecting email signups, showcasing promotions, displaying multimedia, or gating age-restricted content. Whether you want to grow your email list, highlight a new product, or share important announcements, lightboxes give you a focused space to do it without sending visitors to a separate page.
Key Features of a Wix Lightbox
Lightboxes go beyond a traditional popup or modal window, providing a range of customization options and advanced features to enhance the user experience. Here are the key features that make Wix lightboxes effective:
Customizable Design

Lightboxes on Wix offer a wide range of customization options, letting you tailor the design to match your brand's style and aesthetic. You can adjust the colors, fonts, and layout, and add content elements like images, text, buttons, and forms. This ensures your lightbox fits naturally with the rest of your website, making it visually appealing and on-brand.
Flexible Triggering Options
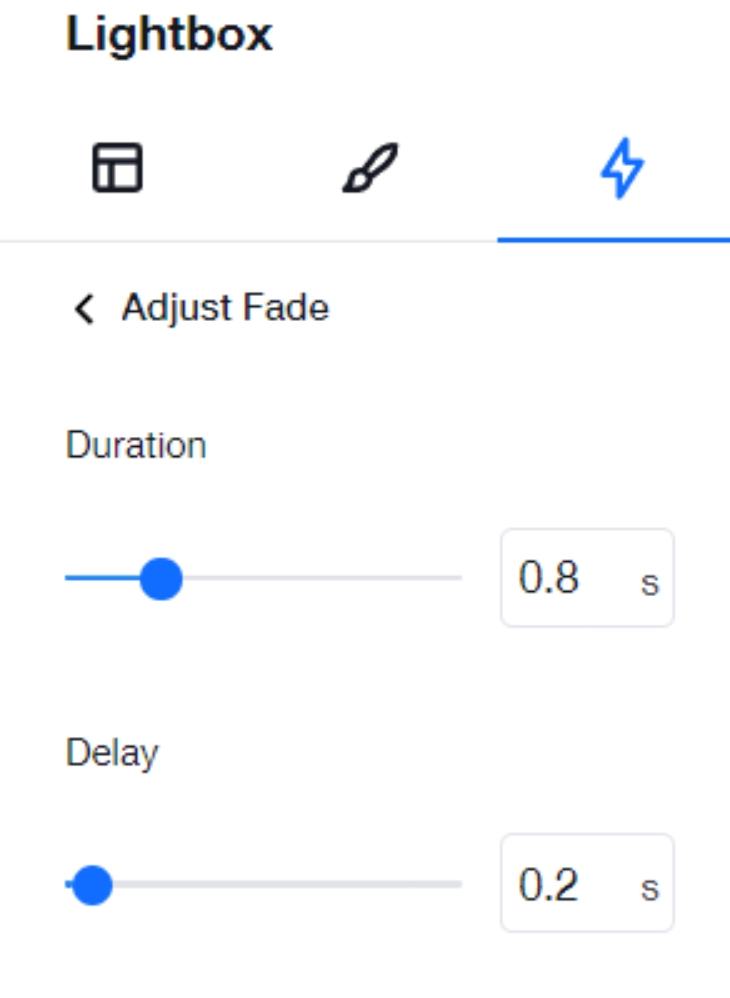
You control exactly when your lightbox appears. Wix lightboxes can be triggered in various ways: on page load, after a set time delay, when a visitor scrolls to a specific section, when they click a button, or when they move to close the tab (exit-intent). This flexibility lets you time the lightbox to maximize impact, whether that's grabbing attention immediately or appearing at a strategic point in the visitor's journey.
Targeted Placement
Lightboxes don't have to appear site-wide. Wix lets you choose which specific pages a lightbox appears on, keeping the content relevant to each visitor's context. For example, you might show a promotion lightbox on your eCommerce pages and a newsletter signup on your blog. You can also control whether the lightbox appears in the center of the screen or aligned to a specific section.
Mobile Optimization
Wix ensures lightboxes display correctly on all devices, including smartphones and tablets. A poorly sized lightbox on mobile can cover the entire screen or be impossible to close, Wix's mobile editor lets you preview and adjust the lightbox layout for smaller screens before publishing.
Analytics & Tracking
Wix provides built-in analytics to track lightbox impressions, views, and conversions. This data lets you understand how effective each lightbox is and make decisions about optimizing its design, copy, or timing. Comparing metrics across different lightbox versions helps you find what works for your specific audience.
Benefits of Using a Lightbox on Wix
A lightbox gives your Wix website a focused space to deliver messages without navigating visitors away from the page. Here are the key benefits:
Increased Engagement and Conversions
Lightboxes are effective at prompting visitors to take action, signing up for your email list, redeeming an offer, or completing a purchase. Because they isolate a single call to action, they convert better than the same offer buried in a page section.
Non-Intrusive User Experience
Unlike traditional pop-ups, Wix lightboxes can be configured to appear subtly and at the right moment, avoiding a disruptive experience. A lightbox with a well-timed trigger and a clear close button respects the visitor's browsing flow while still delivering your message.
Improved Lead Generation
Lightboxes are one of the most efficient ways to capture email addresses. Offering something valuable, a downloadable guide, an exclusive discount, or early access to a promotion, in exchange for an email address turns passive visitors into contacts you can follow up with.
Versatile Content Delivery
Lightboxes can display almost any content type: promotional offers, product videos, image galleries, event announcements, age-verification gates, or embedded forms. This flexibility makes them useful across a wide range of site types, from eCommerce stores to blogs to service businesses.
How to Add a Lightbox on Wix
Adding a lightbox to a Wix site takes about five minutes. Here's how to do it step by step. For a complete walkthrough of every step including trigger configuration and overlay settings, see our detailed guide on how to add a popup on Wix.
Step 1: Open the Wix Editor
Log into your Wix account, open your site's dashboard, and click 'Edit Site' to launch the Wix Editor.
Step 2: Click '+' and Select 'Layout Tools'
In the Wix Editor, click the '+' icon on the left toolbar to open the Add Elements panel. Scroll down to 'Layout Tools' and click it to expand the section.
Step 3: Choose a Lightbox Template
Under Layout Tools, you'll see lightbox template options: Welcome, Subscribe, Promotion, and Contact. Click the template closest to what you need, you can fully customize it after placing it. Click 'Add to Page' to place the lightbox on your site.
Step 4: Customize the Lightbox Content
Click on the lightbox element to open its settings. Edit the text, swap the image, change colors and fonts, and adjust the layout to match your brand. Keep the message focused, one clear call to action works better than multiple competing messages inside a single lightbox.
Step 5: Adjust the Overlay
The lightbox has two parts: the content box and the overlay (the dimmed background). Click the overlay to change its color and opacity. A darker overlay draws more attention to the lightbox; a lighter one feels less intrusive.
Step 6: Set the Trigger
Click on the lightbox element and open 'Settings' to configure when it appears. Options include: on page load, after a time delay, on scroll, on element click, or exit-intent. Exit-intent and time-delay triggers typically convert better than immediate on-load triggers, which can feel interruptive before the visitor has had a chance to engage with the page.
Step 7: Preview and Publish
Use the Preview button at the top of the Wix Editor to test the lightbox before going live. Check that it appears at the right time, the close button works, and the layout looks correct on both desktop and mobile. Once satisfied, click Publish.
Best Practices for Implementing Lightboxes in Wix
When implementing lightboxes on your Wix website, striking a balance between capturing visitor attention and providing a good experience is critical. Lightboxes used correctly can drive real results; used carelessly, they drive visitors away.
Time the Lightbox Appearance Thoughtfully
Don't show a lightbox the moment someone lands on your page. Give visitors at least 30 seconds to absorb your content before the lightbox appears, this makes the offer feel more relevant and less like an interruption. Exit-intent triggers are particularly effective because they only fire when the visitor is already leaving, giving you one more opportunity without disrupting browsing.
Align the Lightbox Content with the Page Context
Relevancy drives conversions. A product page lightbox should offer something directly related to what the visitor is looking at, a discount, a size guide, or a comparison. A blog lightbox should offer a related downloadable or newsletter signup. Generic lightboxes that appear on every page with the same message consistently underperform targeted ones.
Consider an Exit-Intent Lightbox
Exit-intent lightboxes fire just as a visitor moves to close the tab or navigate away. Because they appear at the moment the visitor is already leaving, they don't interrupt the browsing experience, and they give you a final opportunity to convert. A discount code or a "before you go" offer works well here.
Avoid Interrupting User Workflows
Don't show a lightbox when a visitor is mid-checkout, filling out a form, or booking an appointment. Interrupting these flows causes frustration and abandoned conversions. Set your lightbox to appear only on informational pages, not on transactional ones.
Optimize Lightbox Design and Functionality
Keep the lightbox visually clean with a clear headline, one focused message, and a prominent close button. A close button that's hard to find turns visitors hostile. Make sure the lightbox is readable at all sizes, test on a 375px screen as well as a 1440px desktop before publishing.
When Not to Use a Wix Lightbox
Lightboxes can hurt your results just as easily as they help when placed in the wrong context. Before adding one to a page, check whether any of these situations apply:
- Mid-transaction pages: Never show a lightbox on checkout, cart, booking forms, or payment screens. Interrupting a visitor who is actively purchasing causes cart abandonment. Set your lightbox targeting rules to exclude these pages entirely.
- Dedicated landing pages: If a paid ad is driving traffic to a single-goal landing page, a lightbox competes with that goal. Landing pages perform best without interruptions pulling attention away from the main offer.
- Pages that already convert well: If a page is performing without a lightbox, adding one can introduce friction without providing any upside. Check your analytics before adding a lightbox to high-converting pages.
- Immediately on page load for first-time visitors: Showing a lightbox before a visitor has read any of your content means the offer has no context. Most people will close it instantly, and it signals "this site is spammy" before you've given them any reason to trust you.
- Returning visitors who already converted: Showing a "subscribe" lightbox to someone who already joined your email list is a poor experience. Use visitor segmentation or a cookie to suppress lightboxes for people who have already taken that action.
- Slow connections and low-end devices: On very slow connections, a lightbox that loads before the main content appears can block the page entirely. If your audience includes users on 3G or budget phones, test thoroughly before deploying.
Do Wix Lightboxes Affect Your SEO?
Yes, lightboxes can affect your SEO, but only if you implement them in a way that Google considers disruptive. Google has a policy against "intrusive interstitials" on mobile pages. If a lightbox makes your main content inaccessible when a visitor first lands on the page, Google may apply a ranking penalty to that page in mobile search results.
Which Lightboxes Are Safe?
The following types will not trigger Google's penalty:
- Age verification gates required by law (e.g. alcohol or gambling sites)
- Cookie consent banners required by GDPR or similar regulations
- Login dialogs that restrict access to paywalled or members-only content
- Lightboxes triggered by user interaction, such as clicking a button, scrolling to a section, or completing a form
- Small, easily dismissible overlays that do not cover the majority of the screen
The key factor is whether the visitor can easily dismiss the lightbox and access the page content. If yes, Google's guidelines are generally satisfied.
Which Lightboxes Risk a Penalty?
Avoid these configurations, particularly on mobile:
- Popups that fire immediately on page load and cover most of the screen before the visitor has read any content
- Lightboxes with small, hard-to-find close buttons
- Overlays that block the main content area and require the visitor to take an action (other than closing) before they can proceed
How Wix Helps You Stay Safe
Wix's built-in lightbox templates include a clearly visible close button by default. The mobile editor lets you resize and reposition the lightbox separately from the desktop version, so you can make sure it does not fill the entire viewport on smaller screens. Check this for every lightbox you publish.
SEO-Safe Lightbox Checklist
- Use a time-delay trigger (30 seconds or more) rather than firing on immediate page load
- Use exit-intent triggers wherever possible, since the user is already leaving
- Keep the close button large and clearly visible
- Size the lightbox to cover no more than 30% of the viewport on mobile
- Prefer lightboxes triggered by user action (button click, scroll) over automatic ones
GDPR and Cookie Consent Lightboxes on Wix
If your Wix site has visitors from the European Union, the UK, or California, you are likely required by law to get consent before storing cookies or tracking visitor behavior. Wix provides built-in tools for this, but it is worth understanding how the consent flow works and how it interacts with your other lightboxes.
Wix's Built-In Cookie Consent Banner
Wix automatically shows a cookie consent notice (accessible from your site's Dashboard under Privacy and Cookies) that lets visitors accept or reject non-essential cookies. This banner is not a lightbox in the technical Wix sense, but it functions as an overlay and competes for the same screen space.
Avoid Stacking Two Overlays at Once
If your site shows both a Wix cookie consent banner and a marketing lightbox at the same time, visitors face two competing overlays. This usually results in both being dismissed immediately. Set your marketing lightbox to use a time-delay trigger of at least 30 seconds so the consent flow completes before your lightbox fires.
What a Compliant Consent Lightbox Must Include
A GDPR-compliant consent notice must:
- Clearly explain what cookies are being used and why
- Provide a genuine "reject" or "manage preferences" option alongside "accept" (not just an X button)
- Avoid dark patterns, such as making the reject option harder to find than the accept option
- Record when and how each visitor gave consent, so you can demonstrate compliance if asked
Wix's built-in privacy tools handle most of this automatically. If you build a custom consent lightbox using Velo, you must implement each of these requirements yourself and store consent records in a separate database.
Custom Velo Consent Flows
For sites that need more control than Wix's default banner provides, you can build a custom consent lightbox with Velo. Open the lightbox programmatically on page load with $w('#consentLightbox').open(), capture the visitor's response with a button click handler, and write the result to a Wix Data collection with a timestamp and the visitor's session ID. This gives you a full audit trail. For most Wix sites, however, the native consent tool is sufficient and much easier to maintain.
How Lightboxes Affect Page Speed and Core Web Vitals
Core Web Vitals (CWV) are the metrics Google uses to assess page experience: Largest Contentful Paint (LCP), Interaction to Next Paint (INP), and Cumulative Layout Shift (CLS). Lightboxes can affect all three if implemented without care.
Cumulative Layout Shift (CLS)
CLS measures how much content moves unexpectedly as the page loads. Wix's native lightboxes appear as overlays on top of the page rather than as in-flow content, which keeps their CLS impact low. Custom Velo lightboxes that inject elements into the DOM flow can cause visible shifts if timed incorrectly. To avoid this, always open lightboxes as true overlays, not as content that pushes other elements down the page.
Largest Contentful Paint (LCP)
LCP measures how long it takes for the largest visible element on the page to load. A lightbox that preloads large images in the background can delay your LCP element if those resources compete for bandwidth. Keep lightbox images under 100KB where possible, use WebP format, and make sure lightbox resources load after the main page content is already visible to the visitor.
Interaction to Next Paint (INP)
INP measures how quickly the page responds to user input. Lightboxes that run heavy JavaScript animations or attach multiple simultaneous event listeners can slow response times on lower-end devices. Wix's built-in lightboxes use optimized code, but complex Velo-powered lightboxes with many event handlers may introduce INP issues. Keep Velo lightbox code lean, and test on a mid-range Android device as well as a desktop before publishing.
Practical Steps to Minimize Impact
- Use time-delay or exit-intent triggers so lightbox resources load after the main page content is already rendered
- Keep all lightbox images under 100KB; compress with a tool like Squoosh before uploading
- Check your Core Web Vitals in Google Search Console's Page Experience report before and after adding a lightbox
- On mobile, confirm the lightbox does not trigger a reflow that shifts visible content
- For Velo lightboxes, defer non-critical scripts inside the lightbox until after the overlay opens
Wix Lightbox in Wix Studio
Wix Studio (formerly Editor X) uses a slightly different workflow for adding lightboxes compared to the classic Wix Editor. In Wix Studio, add a lightbox through the Add Panel by going to Structure and selecting Lightbox. Trigger settings are found in the Properties panel under the "Behavior" section, where you can choose page load, time delay, scroll depth, or exit-intent triggers.
Wix Studio also supports Velo code, which gives you programmatic control over lightboxes. Open a lightbox with $w('#myLightbox').open() and close it with $w('#myLightbox').close(). This is useful for advanced scenarios such as showing a lightbox after a form is submitted, triggering it from a specific button, or chaining it to a custom event.
Examples of Effective Lightbox Usage on Wix
Wix offers a wide range of possibilities for using lightboxes effectively. Here are real use cases that translate well across different site types:
Promotion Lightbox

Announce a limited-time sale or exclusive offer with a focused lightbox. Highlight the discount using clear visuals and a direct call to action like "Shop Now and Save 20%." A countdown timer inside the lightbox adds urgency without feeling manipulative when the offer is genuine.
Newsletter Sign-Up Lightbox
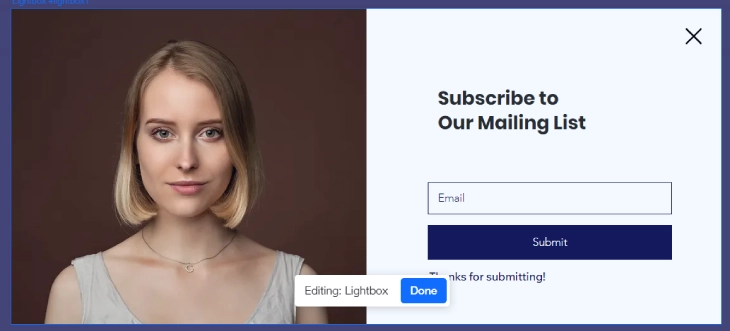
Grow your email list by offering a concrete incentive, a downloadable resource, early access to new products, or a discount code. The lightbox should make the trade clear: "Get the free guide, just enter your email." Vague value propositions ("Sign up for updates!") convert poorly.
Age Disclaimer Lightbox
For age-restricted content, a lightbox requesting age verification acts as a gatekeeper before visitors proceed. This type of lightbox typically contains just a confirmation button, visitors click it to confirm they meet the age requirement and continue to the site. Match the design to your site's branding.
Product Showcase Lightbox
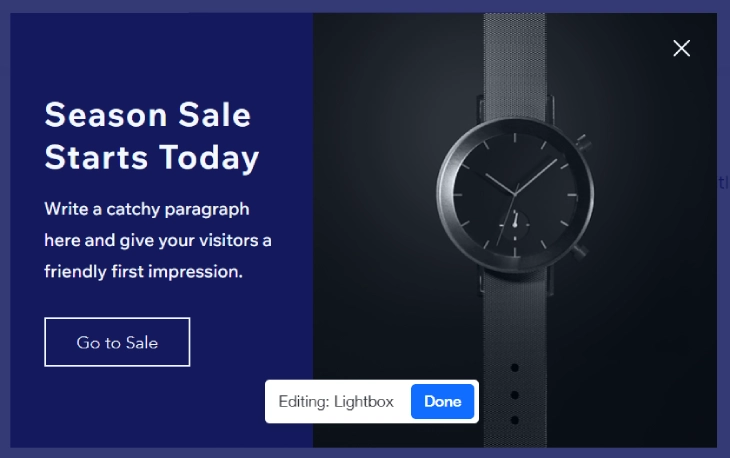
Embedding product images or a short video in a lightbox lets visitors see more detail without leaving the category page. Include a "Learn More" or "Add to Cart" button inside the lightbox to capture visitors who are already showing buying intent by clicking through.
Exit Intent Offer Lightbox
As visitors move to leave your website, a well-timed lightbox can bring them back. A discount code, a free consultation offer, or a lead magnet offer in exchange for an email address works well here. Because exit-intent only fires when the visitor is already leaving, it doesn't interrupt active browsing.
Wix Lightbox: Key Takeaways
Lightboxes are one of the most practical conversion tools available in the Wix Editor. A well-placed lightbox with a relevant offer and a clear close option can meaningfully increase email signups, promotional uptake, and lead capture, without harming the visitor experience. The key is matching the content to the context, timing the trigger thoughtfully, and keeping the design clean. Use the Wix Editor's built-in lightbox templates as your starting point, customize for your brand, and test on mobile before publishing.
For a full step-by-step walkthrough of adding and configuring lightboxes, including trigger settings and overlay customization, see our complete guide on how to add a popup on Wix.
* read the rest of the post and open up an offer