

You can add video to your Wix website in two ways: upload a file directly from your device, or embed from YouTube or Vimeo. Either approach takes under five minutes once you know where to look in the Wix Editor. If you plan to upload videos directly, keep in mind that large video files consume significant storage. A one-minute 1080p video can use 100-150 MB, so check your available storage in the Wix dashboard before uploading large files.
For online creators, business owners, and anyone building a Wix site, video content drives longer visits and gives visitors something to engage with beyond static text and images. Adding videos to a website may feel more involved than uploading images or curating galleries, but Wix makes the process straightforward.
This guide covers how to add and set up Wix Video using the editor, from logging in to customizing your player and publishing your site.
Key Takeaways
- Adding videos to Wix boosts visitor engagement and time on site.
- Wix Video supports direct uploads and YouTube or Vimeo embeds.
- The Wix Video Channel app lets you build a full monetizable video library.
Wix Video Options: Widget vs. Video Channel
Before jumping into the steps, it helps to know which Wix video feature you're actually setting up:
- Video widget (single player or videobox): A simple video element you drag onto any page. Use this when you want one or a few videos embedded in your content, such as a product demo, a welcome video, or a background clip for a section.
- Wix Video Channel app: A full video library feature available through the Wix App Market. This is what content creators, educators, and coaches use to build a library of videos, create paid channels, and offer subscriptions or pay-per-view access. Install it separately from the App Market if you need this.
The step-by-step guide below covers the video widget. If you want the full Video Channel app, install it from the Wix App Market first. The setup steps are different.
Step-by-Step Guide on How to Add and Set Up Wix Video
Wix's video element is built into the editor and doesn't require any third-party tools. You can add it to any page on your site in a few steps.
Step 1: Logging into Your Wix Account
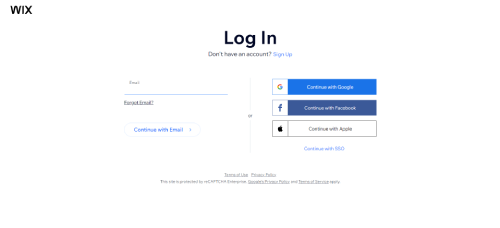
Start by accessing Wix and log into your account. If you're new to Wix, sign up using your email address or a social media account. If you already have a Wix account, proceed to the next step.
Step 2: Access the Wix Editor
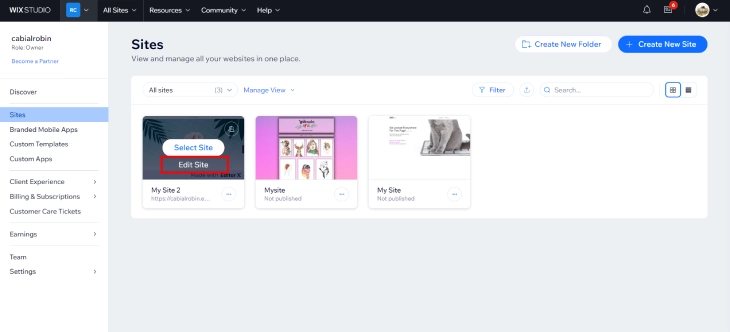
Once logged in, go to your site dashboard and click 'Go to All Sites.' Click on the site you want to edit and select 'Edit Site' to open the Wix Editor. This is where you can make changes to your site, including adding videos.
Step 3: Click '+' on the Dropdown Menu
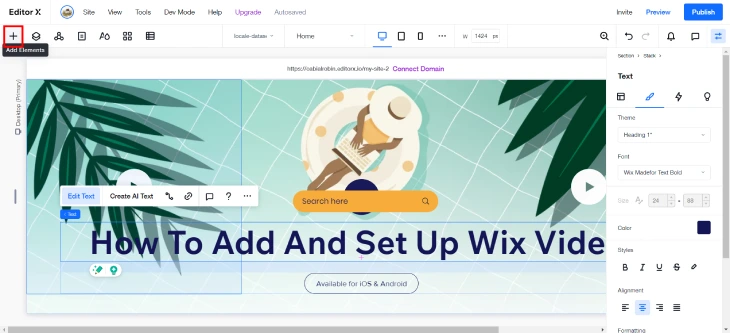
In the Wix Editor, look for the '+' button on the left-hand side of the screen. This button opens a dropdown menu that lets you add various elements to your site, including videos.
Step 4: Click 'Media' and Select Video Type
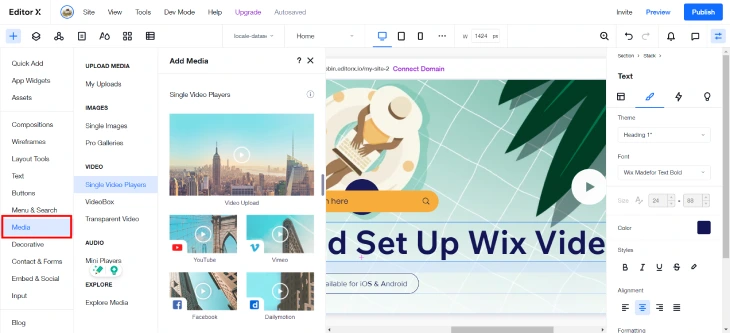
From the dropdown menu, select 'Media' and then choose the type of video element you want to add:
- Single Video Player: a standard player for one video. Best for product demos, welcome videos, or tutorial clips.
- Videobox: a framed video element with more layout control. Good for embedding video within a section or card layout.
- Transparent Video: plays a video without a visible player frame. Used for decorative or animated video overlays.
Step 5: Upload Your Video
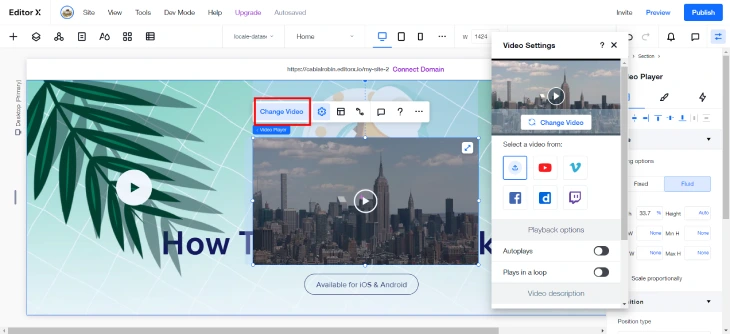
After selecting your video type, the element will appear with a default placeholder video. Click 'Change Video' to choose a video from your media gallery or upload a new file from your device.
Wix supports MP4, MOV, AVI, and WMV file formats. The maximum file size for a single video upload through the editor is 2GB. If your video file is larger, compress it before uploading. Most videos under 10 minutes compress well without visible quality loss.
Step 6: Customize and Manage Your Video Gallery
You can customize your video element to match your site's style. Adjust the layout, add a title and description, control autoplay and loop settings, and add call-to-action buttons. Wix provides settings for the player appearance, so you can match the video to your brand without touching any code.
Step 7: Publish Your Site
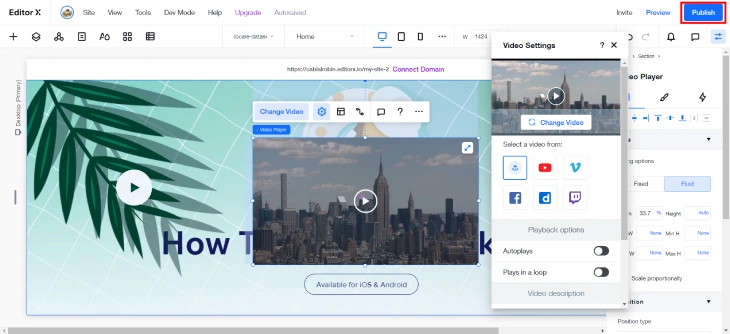
Once you're happy with the setup, click the 'Publish' button to make your changes live. Before publishing, use the preview mode to check how the video looks on both desktop and mobile. Wix's mobile layout is separate and may need its own adjustments.
How to Embed a YouTube or Vimeo Video in Wix
If you don't want to upload a video file directly, you can embed from YouTube or Vimeo instead. This keeps the video hosted on the external platform while still displaying it on your Wix site, with no file upload and no storage limits to worry about.
To embed a YouTube or Vimeo video:
- In the Wix Editor, click '+' and go to Media, then Video.
- Select the Video Player element and add it to your page.
- Click 'Change Video' and choose 'From the web' (or paste the URL directly).
- Paste the YouTube or Vimeo URL for your video.
- Wix will load the video thumbnail and player. Adjust size and position, then publish.
Embedding from YouTube is a good option for public content you're already hosting there. Keep in mind that YouTube videos may show suggested content at the end. If that's a concern, Vimeo's paid plans offer cleaner embedding without external recommendations.
For YouTube-specific embedding options including playlists, autoplay parameters, and YouTube Shorts, see our guide on how to embed YouTube videos on Wix.
How to Add a Video Background to a Wix Section
A video background plays behind your site content rather than in a standalone player. It is commonly used for hero sections, landing pages, and banners to create visual impact without requiring the visitor to press play.
To add a video background in Wix:
- In the Wix Editor, click on any section (strip) on your page.
- In the panel that appears on the left, click the background icon (the paint bucket or section settings).
- Select "Video" as the background type.
- Upload a video file or paste a URL from YouTube or Vimeo.
- Adjust the overlay color and opacity so your text remains readable over the video.
- Publish to see the background in action.
Keep video backgrounds short, between 10 and 30 seconds, and set them to loop automatically. Use a fallback image for mobile devices, since background videos do not autoplay on most mobile browsers. iOS in particular prevents autoplay of audio-enabled videos to conserve data.
File format tip: MP4 with H.264 encoding gives the best balance of quality and file size for background videos. Aim for files under 10 MB to avoid slowing down your page load time. For a full walkthrough of settings and options specific to backgrounds, see our dedicated guide on how to add a video background on Wix.
How to Add Video Using the Wix Owner Mobile App
If you manage your Wix site from your phone, the Wix Owner app (available on iOS and Android) lets you add and update video content without opening a desktop browser. The mobile approach is more limited than the full editor, but works well for quick uploads and swapping existing videos.
To add a video via the Wix Owner app:
- Open the Wix Owner app and tap your site from the dashboard.
- Tap Edit Site to open the mobile editor (a simplified version of the Wix Editor).
- Go to the page where you want to add a video. Tap the '+' icon to add a new element, or tap an existing video element to replace its content.
- Select Video from the element list. Choose to upload from your phone's camera roll or paste a YouTube or Vimeo URL.
- Adjust the placement by dragging the video element to the position you want on the page.
- Tap Publish to push the changes live.
One limitation: the mobile editor does not give you access to the full video player settings (autoplay, loop, thumbnail customization). For those controls, use the full desktop editor. The mobile app is best for uploading a new video quickly or swapping a placeholder, not for precise layout or player configuration.
For blog posts or product pages that you update regularly from your phone, the Wix Owner app also lets you add videos directly inside blog posts using the in-app editor. Tap the '+' button within the blog post editor and select Video from the insert options.
Wix Video Player Settings: Autoplay, Loop, Thumbnail, and Controls
Once you add a video element to your Wix page, you can fine-tune its behavior using the video settings panel. Click on the video element in the editor, then click "Settings" to access these options:
- Autoplay: Turns the video on automatically when the page loads. Useful for product demos or intro videos. If autoplay is enabled, Wix mutes the video by default (a browser requirement). The visitor can unmute manually.
- Loop: Replays the video automatically when it ends. Best for short, atmospheric clips. Turn this off for long-form content.
- Show Controls: Displays the play/pause bar, volume slider, and fullscreen button. Turn off for background or decorative videos where you want a clean look.
- Custom Thumbnail: Replaces the default video thumbnail with an image you choose. A well-designed thumbnail increases click-through rates on videos that don't autoplay. Upload an image file or capture a frame from the video.
- Title: Adds a text overlay to the video player. Good for labeled content in a video library.
- Speed: Not available in the standard player, but Wix Video Channel lets viewers adjust playback speed, which is useful for educational content.
For mobile: Wix generates a separate mobile view for your site. After configuring your video on desktop, switch to mobile preview and adjust the video size and position separately. What looks good on desktop can appear cropped or misaligned on mobile without manual adjustment.
Video SEO: How to Help Google Find Your Wix Videos
Adding a video to your Wix page is only part of the equation. If you want Google to discover and potentially feature your video in search results (with a video thumbnail in the SERP), there are a few additional steps that help.
Write a Descriptive Title and Description for Each Video
In the video settings panel, add a clear title and description. Wix uses this text in the page's structured data markup, which helps Google understand what the video is about. Use your target keyword in the title and describe the video content accurately in 1-2 sentences.
Use a Custom Thumbnail
Google displays video thumbnails in search results and YouTube-style previews. A custom thumbnail, ideally 1280 x 720 pixels, makes your video more recognizable and increases click-through rate when it appears in search. Upload it from the video settings panel.
Add Captions or a Transcript
Captions help Google index your video content by providing a text version of the audio. If your video is for a tutorial or explainer, include a written transcript below the video player on the page. This adds indexable text that reinforces your keywords and helps visitors who prefer reading over watching.
Set the Video to Load Quickly
Page speed is a ranking factor. Large video files slow down page load times, which can hurt both rankings and user experience. Keep self-hosted videos under 100 MB and compressed to web-friendly formats. If file size is a concern, host the video on YouTube or Vimeo and embed via URL. This offloads delivery to their CDN.
Common Mistakes When Adding Video to Wix
These are the errors that most often cause Wix video setups to fail or underperform:
- Uploading an oversized file: Files over 500 MB cause slow uploads and heavy page loads. Compress before uploading. For anything over 200 MB, consider hosting on YouTube or Vimeo and embedding via URL instead.
- Forgetting mobile preview: The desktop and mobile layouts in Wix are separate. A video that looks perfect on desktop may be hidden, cropped, or misaligned on mobile if you skip the mobile preview step.
- Enabling autoplay with sound: Most browsers block autoplaying video with audio. Wix handles this by muting autoplay videos, but visitors may not realize the video is playing at all. Add a visible prompt like "Unmute" or use a silent loop for background video instead.
- No thumbnail for non-autoplay videos: If a video doesn't autoplay, the default Wix thumbnail (first frame of the video) is often bland. Upload a custom thumbnail that shows what the video covers and why it's worth watching.
- Using WMV or AVI format: These formats work technically, but MP4 loads faster and is better supported across all browsers. Convert to MP4 before uploading.
- Placing video in the first section without a purpose: A hero video that doesn't load instantly can frustrate visitors who want information quickly. If you use video at the top of a page, keep it under 5 MB and pair it with a written headline that communicates your value proposition even before the video plays.
Benefits of Using Wix Video
Adding video to your website is one of the higher-return investments you can make in your site's content. Here's what changes when you do it right:
Higher User Engagement
Video content keeps visitors on your page longer. When someone watches a product demo or explainer video, they're spending time with your brand in a way that a text block rarely achieves. More time on page signals to search engines that the content is valuable, which can help with rankings over time.
Built-In Site Integration
Wix Video integrates directly with the rest of your site editor. You don't need a separate plugin or embed code. The video element is part of the same drag-and-drop system as everything else, which means the player loads in line with your site design and adjusts for mobile automatically.
Customization Options
Wix Video gives you control over how the player looks and behaves. You can turn autoplay on or off, set the video to loop, choose a custom thumbnail, hide or show controls, and add call-to-action buttons. These settings let you tailor the video experience to what works for your specific page goal.
Video Monetization
Through the Wix Video Channel app, you can monetize video content with pay-per-view pricing, subscription access, or ad-supported viewing. This is aimed at content creators and online educators who want to sell video content directly from their site without using a third-party platform.
Video Analytics
Wix Video includes built-in analytics showing views, watch time, and engagement data. You can track which videos hold attention and which ones people abandon early, which is useful for refining your content if video is a core part of your site strategy.
Troubleshooting Common Wix Video Problems
When Wix video does not behave as expected, the cause is almost always one of a handful of recurring issues. Here is what to check first before concluding something is broken.
Video Is Not Playing on Mobile
Most mobile browsers block autoplaying video with sound enabled. If your video uses autoplay and has audio, iOS and Android will silently block it. The fix: in the video settings panel, enable autoplay and make sure the video is muted by default. Add a visible control bar so visitors can unmute manually if they want sound. For video backgrounds, mobile browsers typically disable background video playback entirely. Set a static fallback image for the mobile view in the Wix Editor's mobile layout settings.
Video Takes Too Long to Load
Large file sizes are the main cause of slow video loading. Wix accepts files up to 2 GB, but that does not mean you should upload a 2 GB file. For web delivery, keep uploaded videos under 150 MB whenever possible. Compress your video using HandBrake (free) before uploading: use H.264 encoding at 1080p and a constant rate factor (CRF) of 23. This typically reduces a 500 MB video to under 80 MB with no visible quality loss. Alternatively, upload to YouTube or Vimeo and embed via URL. This offloads delivery to their CDN and eliminates the loading speed issue entirely.
Video Shows a Blank Screen After Upload
A blank screen after upload usually means Wix is still processing the video. Processing can take 5-30 minutes for large files. Save your work and return to the editor after waiting. If the blank screen persists after an hour, the upload may have failed silently. Delete the element, re-upload the video, and check the file format. AVI and older WMV files sometimes fail to process correctly. Convert to MP4 before re-uploading.
YouTube Embed Is Not Showing
YouTube embeds fail for one of three reasons: the video is set to private on YouTube, the video has embedding disabled by the owner, or the URL was pasted in an unsupported format. Use the standard video URL (youtube.com/watch?v=...) rather than a shortened link (youtu.be/...) or a playlist URL. If the video is yours and embedding is disabled, go to YouTube Studio, open the video settings, and enable embedding. Private videos cannot be embedded on external sites regardless of settings. Change the privacy to Unlisted if you do not want the video publicly findable on YouTube but still need it to display on your Wix site.
Video Controls Are Not Visible
If the play button and controls are missing, the "Show Controls" setting is turned off in the video element settings. Click the video element in the Wix Editor, open Settings, and toggle "Show Controls" on. If you intentionally hid controls for a background or decorative video but visitors need to interact with it, add a play button as a separate button element on top of the video using Wix's overlay/layer feature.
Video Background Does Not Display on Mobile
This is expected behavior, not a bug. iOS and most Android browsers do not autoplay background videos to conserve data. In the Wix Editor, switch to mobile view, click the section with the background video, and set a fallback static image that will display on mobile instead. Choose an image that captures the mood or message of the video background so mobile visitors get a comparable experience without the video.
How to Add Captions and Transcripts to Wix Videos
Captions and transcripts are two of the most overlooked parts of a Wix video setup. They matter for two separate reasons: accessibility and search indexing.
From an accessibility standpoint, captions allow visitors who are deaf, hard of hearing, or watching without sound to follow your video content. The Web Content Accessibility Guidelines (WCAG 2.1) require captions for all pre-recorded audio content on the web at compliance levels AA and above. If your site serves customers in the EU or you work with organizations that follow accessibility standards, this is not optional.
From an SEO standpoint, Google cannot watch your video. What it can read is the text on your page, the structured data Wix generates, and any caption file associated with the video. Providing that text version of your audio gives Google something to index beyond the title and description fields.
Adding SRT Subtitle Files to Wix Video Channel
If you use the Wix Video Channel app (not the basic video widget), you can upload SRT caption files directly to individual videos:
- Open the Wix Video Channel dashboard from your site manager.
- Select the video you want to add captions to.
- Click "Edit Video," then find the Subtitles section.
- Upload your SRT file. Wix supports SRT format for caption upload. If you have a VTT file, convert it to SRT first using a free online converter.
- Save changes. Captions will appear as an option in the video player for viewers.
The basic video widget (not Video Channel) does not support direct SRT uploads as of mid-2026. For single-video pages using the widget, add a written transcript below the video as a standard text block on the page instead.
Auto-Generated Captions
Wix does not generate captions automatically for uploaded videos. You have three options for creating captions yourself:
- YouTube auto-captions: upload your video to YouTube, let YouTube generate captions automatically (usually within a few hours), download the SRT file from YouTube Studio, and upload it to Wix Video Channel.
- Otter.ai or Rev.com: upload your video to a captioning service and receive a formatted SRT file within minutes (Rev) or in real-time (Otter).
- Manual captioning: write your own SRT file in a text editor. An SRT file is plain text with a specific timestamp format. This is the most effort but gives you full control over caption accuracy and timing.
For short videos under 5 minutes, YouTube auto-captions plus a quick accuracy review is typically the fastest workflow. For anything longer or more technical, Rev.com's human captioning (starting at $1.50/minute) produces higher accuracy with less editing needed.
* read the rest of the post and open up an offer