
To add HTML code on a Wix website, open the editor, click the "+" button on the left toolbar, go to "Embed & Social," select "Custom Embeds," and choose "Embed a Widget." Paste your HTML into the code box and click "Update." That is the fastest method, but Wix actually offers three different ways to add custom code depending on what you need.
This guide walks through each method step by step, with real examples you can copy, a breakdown of Wix's HTML limitations, and fixes for common problems.
Method 1: Add HTML With the Embed a Widget Element
The Embed a Widget element is the most common way to add HTML code on Wix. It places a sandboxed iframe on your page where custom HTML, CSS, and JavaScript run independently from the rest of your site. This is the right choice for embedding maps, forms, third-party widgets, or any self-contained HTML block. One of the most common uses is embedding YouTube videos on Wix using iframe code.
Step 1: Log Into Your Wix Account and Open the Editor
Go to Wix.com and sign in. From your dashboard, select the site you want to edit and click "Edit Site" to open the Wix Editor. If you are new to the platform, you can follow our full guide to designing a website with Wix first.
Step 2: Add the Embed a Widget Element

Click the "+" icon on the left-side toolbar. In the menu that opens, select "Embed & Social," then "Custom Embeds," and finally "Embed a Widget." A placeholder box will appear on your page. Drag it to the position where you want your HTML content to show up.
Step 3: Paste Your HTML Code
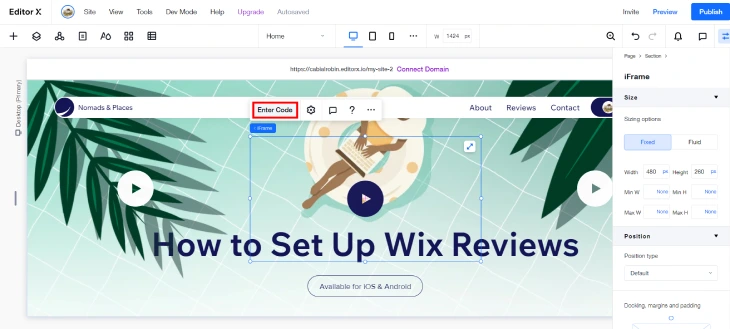
Click the widget, then click "Enter Code." The code editor panel opens. Select "HTML" from the code type dropdown (you can also choose "URL" if you want to embed a page by its web address). Paste or type your HTML. Here is a simple example that embeds a Google Map:
<iframe allowfullscreen="" height="400" loading="lazy" src="https://www.google.com/maps/embed?pb=!1m18..." style="border:0;" width="100%"></iframe>
You can include inline CSS within a
<style type="text/css"> tag and JavaScript within a <script> tag inside the same code block. Everything runs inside the widget's iframe.
Step 4: Click Update and Preview
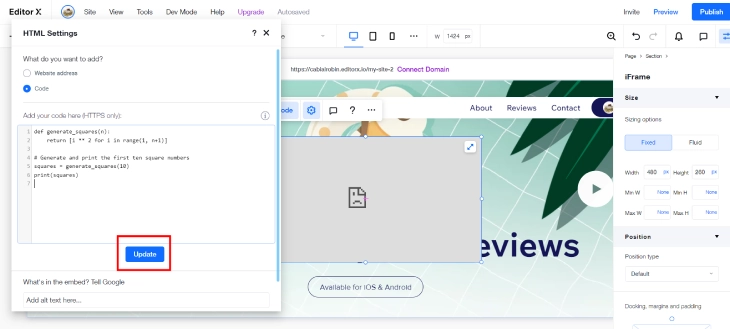
Click "Update" to save your code. The widget will reload and display your HTML content. Use the Preview button at the top right of the editor to see how it looks on a live page. Once you are satisfied, publish the site.
Method 2: Add Custom Code Site-Wide (Head, Body, or Specific Pages)
If you need code to run across every page of your site, such as a Google Analytics tracking snippet, a Facebook Pixel, or a custom CSS override, the Embed a Widget method is not ideal because you would have to add it to each page individually. Instead, use Wix's custom code injection feature in your site settings.
How to Add Site-Wide Code
- In the Wix Editor, click "Settings" in the top menu bar (or go to your Wix Dashboard and find "Custom Code" under "Settings").
- Select "Custom Code" from the left sidebar.
- Click "+ Add Custom Code."
- Paste your code snippet into the text box.
- Give it a name (for example, "Google Analytics").
- Choose where to place the code: Head, Body - start, or Body - end. Most tracking scripts go in the Head section.
- Choose whether to load it on all pages or only specific pages.
- Click "Apply."
This is the correct approach for analytics tags, chat widgets, retargeting pixels, and any script that should fire globally. It is also useful for adding a custom CSS stylesheet that overrides default Wix styling across your entire site.
Example: Adding Google Analytics
<!-- Google tag (gtag.js) -->
<script async src="https://www.googletagmanager.com/gtag/js?id=G-XXXXXXXXXX"></script>
<script>
  window.dataLayer = window.dataLayer || [];
  function gtag(){dataLayer.push(arguments);}
  gtag('js', new Date());
  gtag('config', 'G-XXXXXXXXXX');
</script>
Replace G-XXXXXXXXXX with your actual Measurement ID from Google Analytics.
Method 3: Wix Velo for Advanced Custom Code
For users who need deeper control, Wix Velo (formerly Corvid) is Wix's built-in development platform. Velo lets you write frontend and backend JavaScript that interacts directly with Wix page elements, databases, and APIs. Unlike the Embed Widget, Velo code is not sandboxed in an iframe; it runs as part of the page itself.
Velo is the right choice when you need to:
- Dynamically change page content based on user actions or database queries
- Build custom forms that write directly to Wix databases
- Call external APIs and display the results on your page
- Add event handlers to Wix page elements (buttons, inputs, repeaters)
To enable Velo, click "Dev Mode" in the top menu bar of the Wix Editor and toggle it on. A code panel appears at the bottom of the editor where you can write JavaScript for each page or create backend modules.
Velo has a learning curve, but it is far more powerful than the Embed Widget for anything that needs to interact with Wix's own elements and data. Check our Wix Velo review for a detailed breakdown of what you can build with it.
When NOT to Use the HTML Widget on Wix
The Embed a Widget element is useful in a lot of situations, but there are cases where it is the wrong tool entirely. Knowing when to avoid it will save you time and prevent problems that are hard to diagnose after the fact.
Do not use an HTML widget for any content you want Google to crawl and index. Text, headings, or images placed inside the iframe are not reliably indexed by search engines. Google can sometimes read iframe content, but that content may not be attributed to your page in search rankings. If you are writing a product description, a blog section, or any copy that you want to appear in search results, use native Wix text and image elements. The HTML widget is for functional embeds, not for content you are trying to rank.
Avoid using HTML embeds for navigation menus or important site links. Screen readers and search engine crawlers may not follow links inside sandboxed iframes reliably. If a crawler cannot follow your navigation links, it may not discover other pages on your site. Always build menus and primary navigation with Wix's native menu elements. The same applies to your internal linking structure - links you want Google to count should be in native Wix elements, not inside an HTML widget.
The Embed Widget is also a poor choice for mobile-critical interface elements. While you can resize the widget separately in Wix's mobile editor, the widget does not reflow automatically the way native Wix elements do. If a UI component needs to look correct on every screen size without constant manual adjustments, a native Wix element or a properly configured Velo component will behave more predictably. The extra maintenance overhead of keeping a pixel-sized iframe looking right across devices is rarely worth it when a native Wix alternative exists.
Finally, be cautious about placing interactive tools inside HTML widgets for mobile users. Forms, maps, and scroll-driven interactive elements inside iframes can have unexpected touch and scroll behavior on iOS and Android. A tap that should activate a form field may instead scroll the parent page. If your HTML widget is something users need to interact with on mobile, test it on real devices (not just a browser resize) before publishing. In many cases, a Velo-powered component or a dedicated Wix app will give you a better result with less friction.
What You Can Add With HTML on Wix: Practical Examples
Here are common use cases for adding HTML code on Wix:
- Google Maps: Embed an interactive map using an iframe from Google Maps' "Share or embed map" option.
- Third-party forms: Paste embed code from Typeform, JotForm, or Google Forms to add forms that go beyond what Wix's built-in contact forms offer.
- Social media feeds: Embed Instagram, Twitter/X, or Facebook feeds using their official embed codes.
- Custom countdown timers: Add HTML/CSS/JS countdown timers for product launches or events.
- Pricing tables: Build custom-styled pricing comparison tables with HTML and CSS.
- Chat widgets: Add live chat tools like Tawk.to, Crisp, or Drift via their embed snippets.
- Custom CSS styling: Override default Wix styles by injecting CSS through the site-wide custom code method.
- Analytics and tracking: Add Google Analytics, Meta Pixel, Hotjar, or other tracking scripts globally.
Wix HTML Limitations You Should Know
Before adding HTML code on Wix, be aware of these platform-specific constraints:
- Sandboxed iframes: The Embed a Widget element loads your code inside an iframe. Your HTML cannot access or modify other elements on the Wix page outside that iframe. Communication between the iframe and the parent page requires
postMessage(). - No direct DOM access: You cannot use JavaScript to select or manipulate Wix elements (headers, buttons, menus) from an HTML widget. For that, you need Wix Velo.
- HTTPS required: All external resources (scripts, stylesheets, images, iframes) loaded within your HTML must use HTTPS. HTTP links will be blocked by the browser's mixed-content policy.
- Size constraints: The Embed Widget has a fixed container size on the page. If your HTML content is taller than the widget box, it will scroll internally rather than expanding the page. Resize the widget manually in the editor to fit your content.
- No server-side code: The Embed Widget only supports client-side HTML, CSS, and JavaScript. If you need server-side logic, use Velo's backend modules instead.
- Premium plan may be required: Some custom code features, including site-wide code injection via Settings, are only available on paid Wix plans.
Troubleshooting Common HTML Issues on Wix
Even with correct code, things can go wrong. Here are the most common problems and how to fix them.
HTML Code Not Displaying
If your code does not appear after clicking Update, check these causes in order:
- Syntax errors: A missing closing tag like
</div>or an unclosed quote can prevent the entire block from rendering. Paste your code into an HTML validator to catch issues quickly. - Widget not updated: Make sure you clicked "Update" after pasting. The widget does not auto-save.
- Mixed content blocking: If your code loads external resources over HTTP instead of HTTPS, the browser will silently block them. Check your browser's developer console (F12) for mixed-content warnings.
- Widget size too small: The content may be rendering but the widget is too small to show it. Drag the widget handles in the editor to increase its height.
JavaScript Not Running
Wix's HTML widget runs code inside a sandboxed iframe, which has restrictions. If your JavaScript is not executing:
- Check the browser console for errors (right-click the page, select "Inspect," then click "Console").
- Confirm that any external script URLs use HTTPS and are publicly accessible.
- Some JavaScript APIs that require access to the parent window (like
document.cookieon the main page) will not work inside the sandboxed iframe.
CSS Styling Conflicts
If your embedded HTML overlaps with other page elements or looks broken:
- The HTML widget is an iframe, so its internal CSS should not leak into the main page. However, the widget container itself can overlap other Wix elements if positioned incorrectly. Use the editor's layering controls (right-click > "Arrange") to fix stacking issues.
- If you added custom CSS via site-wide code injection and it is affecting elements you did not intend, make your CSS selectors more specific to avoid unintended overrides.
Code Not Responsive on Mobile
The Embed Widget does not automatically resize for mobile. To make your embedded content responsive:
- Use percentage-based widths (
width: 100%) instead of fixed pixel values inside your HTML. - Add a viewport meta tag inside your HTML widget:
<meta name="viewport" content="width=device-width, initial-scale=1">. - Switch to the mobile editor view in Wix (click the phone icon at the top of the editor) and resize the widget separately for mobile screens.
- Use CSS media queries within your HTML to adjust layouts at different breakpoints.
Security Tips for Adding HTML Code on Wix
Custom code opens up possibilities, but it also introduces risk if you are not careful:
- Only paste code from sources you trust. Random code snippets from forums or unknown websites may contain malicious scripts that steal visitor data or redirect traffic.
- Review third-party scripts before adding them. Read through any JavaScript you add to understand what it does. Look out for obfuscated code or suspicious external URLs.
- Keep tracking scripts updated. Outdated analytics or chat widget scripts may have known vulnerabilities. Check the provider's documentation periodically for updated embed codes.
- Test in preview mode first. Always preview your site after adding or changing custom code. If something breaks, you can remove the code before it affects live visitors.
- Limit permissions. If you are on a team, restrict who can add or edit custom code in the Wix dashboard settings to prevent accidental or unauthorized changes.
Communicating Between Your Wix Page and an HTML Widget
One capability most Wix HTML tutorials skip: you can pass data back and forth between your Wix page and an HTML widget using the browser's postMessage API. This is useful when you need the widget to respond to something on the page (a visitor's input, a product selection, a logged-in user's data) or when you want the widget to send data back to Wix (form submission results, calculator outputs, user choices).
Sending Data from Wix to the HTML Widget
In Wix Velo, you can send a message to an HTML widget element using the postMessage method:
// Wix page code (Velo)
$w('#myHtmlWidget').postMessage({
  type: 'user-data',
  name: $w('#nameInput').value,
  plan: 'premium'
});
Inside your HTML widget code, listen for this message using the window.onmessage event:
// HTML widget code
window.onmessage = function(event) {
  if (event.data.type === 'user-data') {
    document.getElementById('greeting').textContent = 'Hello, ' + event.data.name;
  }
};
Sending Data from the HTML Widget Back to Wix
When the user completes an action inside the widget (submits a form, selects an option, finishes a quiz), you can send that result back to the Wix page:
// HTML widget code
document.getElementById('submitBtn').addEventListener('click', function() {
  window.parent.postMessage({type: 'quiz-result', score: 85}, '*');
});
In Wix Velo, listen for this on the widget element:
// Wix page code (Velo)
$w('#myHtmlWidget').onMessage((event) => {
  const score = event.data.score;
  $w('#resultText').text = 'Your score: ' + score;
});
When This Is Useful
- Custom calculators that output a result to the Wix page (e.g., a mortgage calculator that populates a contact form)
- Third-party payment widgets that need to notify Wix when a transaction completes
- Interactive quizzes or assessments where the result determines which section of the page to show
- Personalisation where the widget displays content based on the logged-in Wix member's profile data
This technique works in both the classic Wix Editor and Wix Studio. The Wix Velo code runs on the client side, and the postMessage communication stays within the browser without any server calls.
HTML Embeds and Core Web Vitals: What to Watch Out For
Core Web Vitals (LCP, CLS, and INP) are a confirmed Google ranking factor. Every HTML widget you add to a Wix page has the potential to affect all three scores, and in some cases the impact is significant enough to push a page out of the "good" range. Understanding how each metric is affected will help you add embeds without taking a rankings hit.
LCP (Largest Contentful Paint) measures how long it takes for the biggest visible element to load. If your embedded widget is the first thing a visitor sees above the fold, and it takes several seconds to initialize, that delays your LCP score. The fix is straightforward: add loading="lazy" to any iframes that sit below the fold, so the browser does not try to load them until the user scrolls down. For embeds that appear near the top of the page, keep them lightweight. If you need a map or a media widget in the hero area, consider a static image as a placeholder that links to the interactive version instead.
CLS (Cumulative Layout Shift) measures how much the page moves around as it loads. An HTML widget that loads asynchronously and then expands to its full size can push other content down the page, creating a jarring shift for visitors and a high CLS score. The most reliable way to prevent this is to set a fixed height on the widget container in the Wix editor before you publish. Measure the expected rendered height of your embed (you can check it in the editor's preview mode) and lock the widget to that height. If the content inside is dynamic and its height varies, set the widget height to the largest expected size so there is no shift when content loads in.
INP (Interaction to Next Paint) measures how quickly the page responds after a user interaction. Heavy JavaScript inside embedded widgets, particularly marketing tools, chat widgets, and social media feeds, can block the browser's main thread and make every click or tap feel slow. For third-party scripts with a significant JavaScript footprint, add them via site-wide custom code injection in the Body - end section rather than the Head. Use the async or defer attribute on script tags so they do not block the initial page render. Chat widgets are frequent offenders here: if your INP score is poor, temporarily disable any chat embed and re-test to confirm it is the source.
To check your current Core Web Vitals scores, run your live site through Google PageSpeed Insights at pagespeed.web.dev. The tool shows field data (real-user measurements from Chrome) and lab data (a simulated test). If your scores are in the "needs improvement" or "poor" range and you have multiple HTML embeds active, try disabling them one at a time in the Wix editor and re-running the test. That will tell you which embed is responsible for the drag before you start optimizing.
* read the rest of the post and open up an offer