
If you want to share your Wix website link, the quickest way is to copy the URL directly from your browser once your site is published. There are several other ways to share your Wix site, via social media, email, QR code, or even a preview link before you publish. This guide covers all of them.
We also cover how to invite collaborators to work on your site, which is a different kind of "sharing" that gives others editor access rather than just a link to view.
For more context on this topic, see our guide on invite collaborators to your Wix site.
How To Share Your Wix Website Link (Live Site URL)
The simplest way to share your Wix website link is to copy it from your browser after publishing. Here is how:
- Log in to your Wix account and open your site dashboard.
- Click Publish in the Wix Editor if you have not already published your site.
- Once published, click View Site. Your live site opens in a new browser tab.
- Copy the URL from the browser's address bar, this is your Wix website link.
- Paste it anywhere: an email, a social post, a text message, or a business card.
By default, your Wix URL will look like username.wixsite.com/sitename unless you have connected a custom domain. If you have a custom domain connected, the URL will be your own domain (e.g., yourbusiness.com).
How To Find Your Wix URL Inside the Editor
If you have not yet published your site, or you just want to check your URL without leaving the editor, Wix shows you the address in two places:
- Site Settings: In the Wix Editor, click the Site menu at the top left, then select Site Settings. Your site address appears at the top of the panel.
- Dashboard → Site Actions: From your Wix dashboard, scroll down to find the Site Address shown next to your site name.
If your site uses a free Wix subdomain (username.wixsite.com/sitename), the URL is fixed and cannot be changed without connecting a custom domain. Upgrading to a paid Wix plan lets you connect your own domain, which makes your link shorter and more professional to share.
How To Optimise Your Social Preview Before Sharing
When you paste a Wix website link into Facebook, LinkedIn, or X (Twitter), the platform automatically pulls a preview card showing your site's title, description, and an image. If this preview looks wrong, missing image, generic title, or no description, it will reduce click-through rates.
To control what appears in the preview card:
- In the Wix Editor, open Site Settings and go to Social Share (sometimes called SEO → Social Media).
- Set a Social Share Title, this is what appears as the card headline. Keep it under 70 characters.
- Set a Social Share Description, a brief sentence that explains what the site is about. Aim for 100–200 characters.
- Upload a Social Share Image, recommended size is 1200×630 pixels. Use a high-quality photo or graphic that represents your brand.
- Publish your site, then test the preview using the Twitter Card Validator or Facebook's Sharing Debugger.
Getting this right before you share your link means every share on social media works as a mini advertisement for your site.
How To Share Your Wix Site on Social Media
Wix includes built-in tools for sharing your site link directly to social media platforms. You can also use social media icons on your Wix site to make it easy for visitors to share your content.
To share your Wix site link on social media manually:
- Copy your live site URL as described above.
- Open your chosen social media platform (Facebook, Instagram, X/Twitter, LinkedIn, etc.).
- Create a new post and paste your Wix website link into it.
- Add a short description or call to action, then publish your post.
Most social platforms will automatically generate a preview card with your site's title and featured image when you paste the URL. Make sure your Wix site's social share settings (title, description, and social image) are set up correctly for the best preview, see the section above for how to do this.
How To Share Your Wix Site via Email
Sharing your Wix website link by email is straightforward:
- Copy your published Wix site URL.
- Open your email client and compose a new message.
- Paste the link into the body of your email. For a cleaner look, hyperlink it to descriptive anchor text, for example, "Visit my website" or "See my portfolio" rather than pasting the raw URL.
- Send it to your contacts, subscribers, or anyone you want to reach.
If you send newsletters or marketing emails through a platform like Mailchimp or ActiveCampaign, you can add your Wix website link as a button or text link inside your email campaigns. Using a button with a clear call to action, such as "View the site", typically gets higher click rates than a plain text link.
How To Share a Wix Preview Link (Before Publishing)
If your site is not yet published, you can still share a preview link to get feedback from clients or collaborators before going live:
- Open your site in the Wix Editor.
- Click the Preview button at the top of the editor.
- In preview mode, click Share Preview in the top bar.
- Copy the preview link and share it.
Preview links let others view your site exactly as it would appear when published, without making it live. Note that preview links expire after a set period, so send them promptly. Recipients do not need a Wix account to view the preview.
How To Share Your Wix Website Link as a QR Code
A QR code is a practical way to bridge your online and offline presence, put it on business cards, flyers, menus, product packaging, or signage. When someone scans it with a smartphone, it takes them straight to your Wix site.
Here is how to generate one:
- Copy your published Wix site URL from the browser.
- Open a QR code generator, free tools include QR Code Generator (qr-code-generator.com) or QRCode Monkey (qrcode-monkey.com). No account is needed.
- Paste your URL into the input field and click Generate.
- Download the QR code as a PNG or SVG file. Use SVG for print materials so it stays sharp at any size.
- Insert the QR code image into your print designs or display it on screen.
For a full walkthrough including Wix's native QR code tools, see our guide on how to create a QR code for your Wix website. Always test the QR code with your phone before printing to confirm the link is correct.
How To Shorten Your Wix Website Link
If your Wix URL is long, especially a free subdomain like yourusername.wixsite.com/mybusiness, it can look unwieldy in print materials, email signatures, and social media bios. A URL shortener converts it into a compact link that is easier to type and share.
Here is how to shorten your Wix website link:
- Copy your published Wix site URL.
- Open a URL shortener such as Bitly (bitly.com) or TinyURL (tinyurl.com).
- Paste your long URL into the input field and click Shorten.
- Copy the shortened link (e.g., bit.ly/abc123) and use it wherever you need a compact URL.
A few things to keep in mind:
- Free vs. paid shorteners: Free plans (Bitly, TinyURL) work fine for basic use. Paid plans let you use a custom domain for your shortened links, for example, go.yourbrand.com/shop, which looks far more professional and reinforces your brand in every link you share.
- Built-in tracking: Most URL shorteners log click counts, the countries clicks came from, and what device was used. This gives you basic analytics even if you have not set up UTM parameters (covered in the next section).
- QR codes + shortened URLs: If you are also creating a QR code, using a shortened URL makes the QR code simpler and easier to scan, shorter URLs generate less complex QR patterns.
- Custom domain is the cleanest solution: If you upgrade to a paid Wix plan and connect your own domain, your URL becomes short by default (e.g., yourbusiness.com). This removes the need for a shortener entirely for your homepage link.
How To Track Link Clicks with UTM Parameters
Copying and sharing your Wix website link tells you that people visited. UTM parameters tell you where they came from, which email, which social post, which ad campaign. This is essential if you are sharing your link across multiple channels and want to know which one actually drives traffic.
UTM parameters are short tags added to the end of your URL. Google Analytics reads them and records the source of each visit. For example:
https://yourdomain.com/?utm_source=instagram&utm_medium=social&utm_campaign=may-launch
The three most important UTM tags are:
- utm_source, Where the traffic comes from (e.g., instagram, newsletter, google)
- utm_medium, The type of channel (e.g., social, email, cpc)
- utm_campaign, The specific campaign or promotion (e.g., may-launch, summer-sale)
To create a UTM-tagged link for your Wix site:
- Go to the Google Campaign URL Builder (search "Google Campaign URL Builder", it is a free tool at ga-dev-tools.google.com).
- Paste your Wix website URL into the Website URL field.
- Fill in the Campaign Source, Medium, and Name fields.
- The tool generates a complete tagged URL at the bottom. Copy it.
- Use this tagged URL when sharing on that specific channel, paste it into your Instagram bio link, your email newsletter button, or your ad.
A few practical tips:
- Use lowercase consistently: UTM tags are case-sensitive. "Instagram" and "instagram" are counted as two different sources in your analytics.
- Keep campaign names descriptive but short: Something like "may-sale" is easier to read in reports than "may-2026-spring-promotion-email-1".
- Shorten the tagged URL: UTM-tagged links are long. Run them through Bitly or a similar tool before pasting them in social posts or print materials.
- Check results in Google Analytics: In GA4, go to Reports → Acquisition → Traffic Acquisition to see clicks broken down by UTM source and medium.
If you have not yet connected Google Analytics to your Wix site, you can do this through Settings → Advanced Settings → Google Analytics inside your Wix dashboard. Once connected, all UTM-tagged clicks are recorded automatically.
Where to Add Your Wix Link Online
Sharing your Wix website link is not just about pasting it into messages. The most effective approach is to place it everywhere your potential visitors already spend time. Here are the highest-value places to add your link.
Google Business Profile
If you serve local customers, your Google Business Profile listing is often the first place people find you. Adding your Wix website link here is straightforward: log in to your Google Business Profile, go to the “About” tab, and add your site URL in the Website field. This link appears directly in Google Search results and on Google Maps when someone searches for your business, making it one of the highest-impact placements for your Wix link.
LinkedIn Profile
LinkedIn lets you add a website URL to your personal profile and your company page. To add your Wix site to your personal profile, go to your profile, click “Contact info,” and add your site URL under Websites. Use a descriptive label like “My Portfolio” or “Company Website” rather than the default generic label. For a company page, the website field is in the Page info section under Edit page.
Instagram Bio Link
Instagram allows one clickable link in your bio, so make it count. Add your Wix website URL directly in your Instagram profile settings. If you want to link to multiple pages (your homepage, a product page, a booking form), tools like Linktree or Wix’s own link-in-bio builder let you create a simple landing page that lists several links, all accessible from that single bio URL.
Email Signature
An email signature is one of the most consistent ways to share your Wix link. Every email you send becomes a passive promotion for your website. Set up your signature with a hyperlinked phrase like “Visit my website” or your business name rather than pasting the raw URL, which looks cluttered. Most email clients (Gmail, Outlook, Apple Mail) let you format signature links directly in settings. If you have connected a custom domain to your Wix site, use that domain in your signature rather than the wixsite.com subdomain for a more professional appearance.
Google Maps and Online Directories
If your business is listed on directories or review platforms (Google Maps, Yelp, Tripadvisor, Apple Maps), add your Wix website link to each listing. Consistent links across directories help search engines confirm your business’s legitimacy and location, which can improve local search rankings.
Why Is My Wix Website Link Not Working?
If someone tells you your Wix link is not loading, or if you click your own URL and see an error, here are the most common causes and fixes:
- Site not published: The most common reason. Your Wix site is only accessible at its URL once you click Publish. Log into the editor and confirm the site is published.
- Wrong URL: Double-check that the URL you shared is the correct one. If you recently connected a custom domain, the old username.wixsite.com URL may redirect, but the custom domain is now the primary address.
- Domain not connected properly: If you just purchased or transferred a domain, DNS propagation can take up to 48 hours. During this time the site may be unreachable on the custom domain, but the Wix subdomain link should still work.
- Site is password-protected: If you added password protection (under Site Settings → Password Protection), visitors will see a login screen rather than your site. Remove the password or share the password alongside the link.
- Wix page is hidden from navigation: A page that is hidden from your menu is still accessible via its direct URL, check that the specific page URL (not just the homepage) is what you shared.
How To Share Your Wix Website With Collaborators (Editor Access)
If you want to share a link to a specific section within a page (not just the homepage), use anchor links on Wix to create a direct URL that scrolls to that section automatically. If you want to give someone the ability to edit your Wix site, not just view it, you need to invite them as a collaborator. This is different from sharing your website link. Collaborator access lets team members log into Wix and make changes based on the role you assign them.
Here is how to invite collaborators using Wix's Roles & Permissions system:
Step 1: Log into Your Wix Account
Start by accessing Wix and log into your account. If you are new to Wix, you will need to create an account first using your email address or a social media login.
Step 2: Go to Roles & Permissions in Your Dashboard
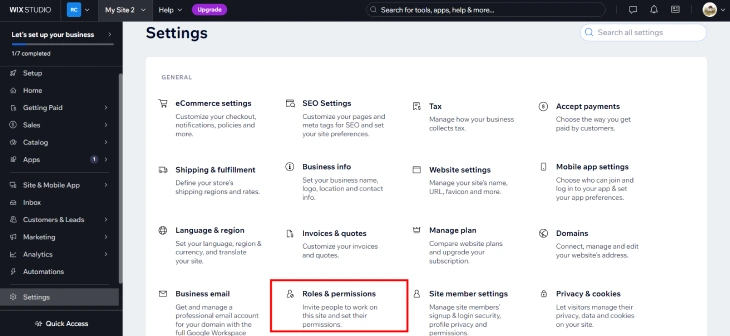
Once logged in, go to the Roles & Permissions section of your dashboard. This is where you control who has access to your site and what actions they are permitted to take.
Step 3: Click Invite Collaborators
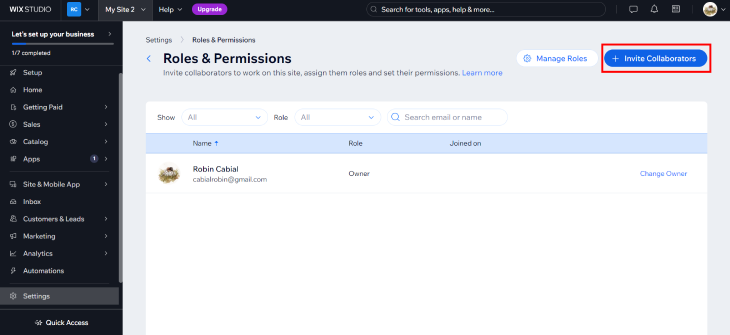
Inside Roles & Permissions, click the Invite Collaborators button. This opens the invitation screen where you can add people and assign them a role.
Step 4: Enter Your Collaborator's Email Address
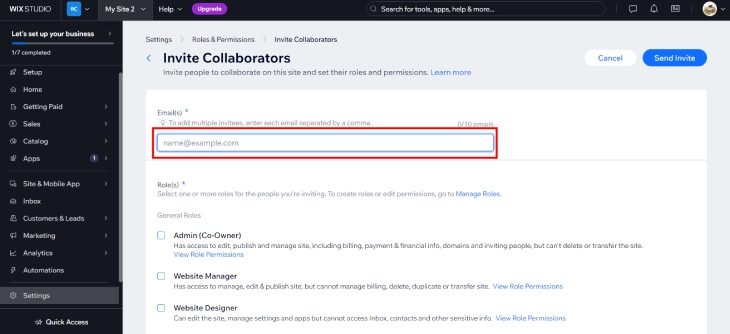
Enter the email address of the person you want to invite. Double-check the address to make sure your invitation reaches the right person.
Step 5: Select the Relevant Role

Choose the role that matches the level of access you want to give this person. Roles range from full Admin access to narrower roles like Blog Editor or Store Manager. See the roles overview below for guidance.
Step 6: Click Send Invite
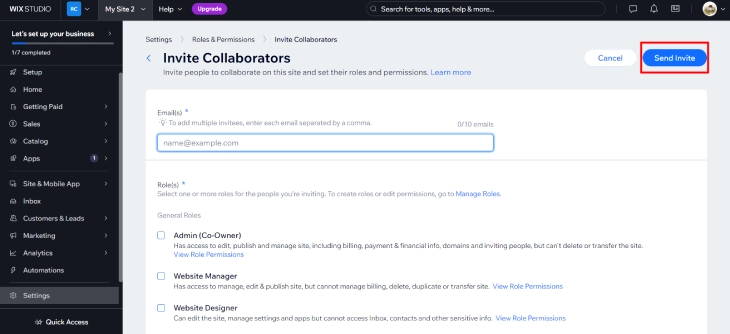
Click Send Invite. Your collaborator will receive an email invitation they can accept to gain access to your Wix site.
Wix Collaborator Roles Explained
When inviting collaborators, choosing the right role matters. Each role defines exactly what a team member can and cannot do on your site.
Admin (Co-Owner)
The Admin role has near-complete control over the website, they can edit, manage, and publish content, oversee billing, and manage group settings. The only restrictions are that they cannot delete the site, transfer ownership, or connect a domain independently.
Website Manager
Website Managers can manage and edit the site and publish changes, but they cannot handle billing, delete, duplicate, or transfer the site. This role is ideal for day-to-day site management.
Website Designer
Website Designers can modify the site's design, manage settings, and handle apps, but they cannot access sensitive areas like the Inbox or contacts. Best for freelance designers working on visuals only.
Back Office Manager
Back Office Managers handle administrative dashboard settings and applications without the ability to edit the website's front end directly.
CMS Roles
CMS Editors can add and modify content within collections. CMS Admins have additional power to change content structures. These roles are useful for content teams who manage databases or dynamic content without needing broader site access.
Billing and Domain Management Roles
Billing Managers oversee purchases and subscriptions. Domain Managers focus solely on domain-related tasks. Assign these roles to team members who handle finances or domain settings only.
Marketing and Customer Management Roles
Marketing Managers have access to all marketing tools, customer data, and analytics. Customer Relations Managers focus on contacts, forms, and communication channels for direct customer interaction.
Store, Blog, and Booking Roles
Store Managers oversee all eCommerce functions including products and orders. Blog Editors manage blog publishing and content. Booking Admins handle all scheduling and booking-related tasks.
How to Share a Specific Page Link on Your Wix Site
Most of the guidance above covers sharing your site's homepage URL. But often you want to share a direct link to a specific page, a product page, a blog post, a booking page, or a landing page, not just the root domain. Here is how to get and share any specific page's URL on Wix.
Finding a Specific Page's URL
- Open your published Wix site in a browser (not in the editor).
- Navigate to the specific page you want to share: click the menu link or navigate manually.
- Copy the full URL from the browser's address bar. For a custom domain site, it will look like yourdomain.com/page-name. For a free Wix subdomain, it will be username.wixsite.com/sitename/page-name.
- Share this URL directly. This is a permanent link to that specific page, not just the homepage.
Getting a Page URL Without Visiting the Live Site
If you are in the Wix Editor and want to see the URL of a specific page without previewing it:
- In the Wix Editor, click the Pages icon in the left sidebar.
- Hover over the page you want to share and click its More Actions icon (three dots).
- Select SEO Basics. In the Page Info tab, you will see the page's URL slug, which is the path after your domain. For example, if the slug is /contact, the full URL is yourdomain.com/contact.
Sharing Wix Blog Post Links
If you want to share a specific Wix blog post, the URL structure is typically yourdomain.com/post/blog-post-title. Open the published post in your browser and copy the URL from the address bar. Each blog post has its own permanent URL (permalink) that stays stable even if you edit the post's content later. If you change the post's URL slug after publishing, set up a redirect from the old URL to the new one to avoid broken links.
Sharing a Wix Product Page
Wix Store product pages have their own URLs in the format yourdomain.com/product-page/product-name. Navigate to the product on your live site and copy the URL. You can share these directly in emails, social posts, or ad campaigns. If you are running a sale on a specific product, sharing the product page URL (rather than your store homepage) takes visitors directly to the right item, which reduces friction and typically improves conversion rates.
How To Share Your Wix Website Link: Summary
To share your live Wix site URL, copy it from your browser and paste it wherever you need, an email, a social post, or a printed QR code. To share a preview before going live, use the Share Preview button inside the Wix Editor. To give team members edit access, use Roles & Permissions to invite collaborators with the appropriate role level.
Before sharing widely, take five minutes to set up your social share image, title, and description in Site Settings. It makes every link you share look polished and drives more clicks. If you are running paid campaigns or sharing across multiple channels, add UTM parameters to each link so you know which channels are actually delivering visitors to your site.
* read the rest of the post and open up an offer