
Text is the backbone of any Wix website. It conveys your message, shapes how visitors perceive your brand, and directly affects whether people stay on your page. Adding and editing text on Wix takes seconds: click the '+' icon, choose a text type, and start typing. Editing an existing text element is just as fast. Click it, hit 'Edit Text', and adjust the font, size, color, or wording directly in the side panel.
This guide walks through every step of adding and editing text in the Wix Editor, covers all the text element types available, and shares practical tips for font consistency, mobile readability, heading structure, and copying styles between elements. If you want a broader look at the full editing workflow, see how to edit a Wix website from start to finish.
Step-by-Step Guide to Adding and Editing Text on Wix
Adding text to a Wix page and editing it afterward are both done in the Wix Editor. The steps below cover the full process, from placing a text element to adjusting its formatting and previewing on mobile.
Step 1: Click '+' and Select 'Text' in the Dropdown Menu

In the Wix Editor, click the '+' icon on the left-hand toolbar to open the Add Elements panel. From the list of categories, select 'Text'. This shows all the text element types you can add to the page.
Step 2: Select the Type of Text You Want to Add
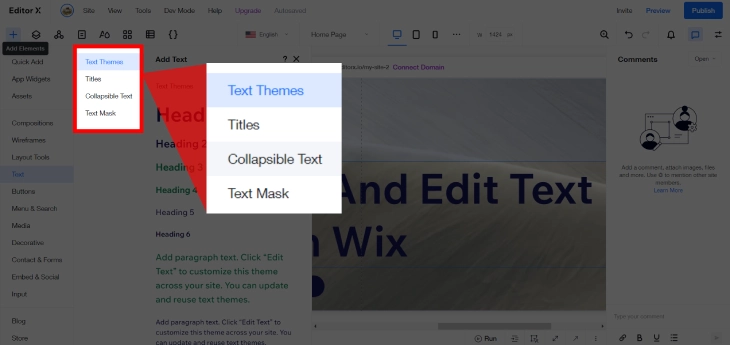
Wix offers several pre-designed text styles including Text Themes, Title, Collapsible Text, and Text Mask. Each serves a different purpose. See the Types of Text section below for a full breakdown. Click the style that fits your needs and Wix places it on the page automatically.
Step 3: Double-Click to Type or Paste Your Text
Once the text element is on the canvas, double-click it to enter edit mode. You can type directly or paste text from another source. Wix strips most formatting when you paste from a Word document or Google Doc, which is useful for keeping your site's typography consistent.
Step 4: Select the Text Element and Click 'Edit Text'
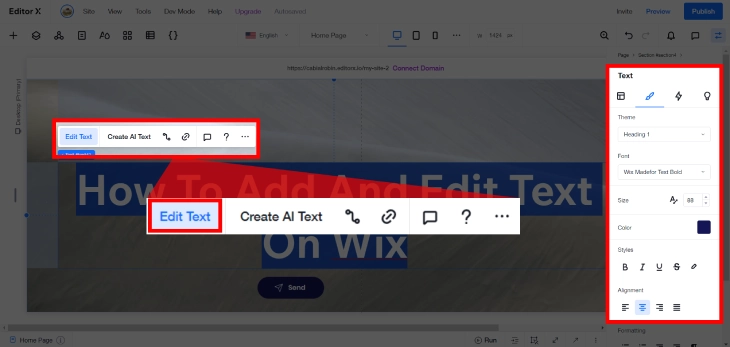
To edit any text already on the page, click the text element once to select it, then click 'Edit Text'. The side panel opens with options to change the font, size, color, alignment, line spacing, and character spacing. You'll also see shortcuts for 'Create AI Text', 'Connect to CMS', and a link icon to add links to your text.
Step 5: Apply Heading Styles for SEO
Rather than just increasing font size to create a visual heading, use the heading style dropdown in the text toolbar. Select H1 for your main page title, H2 for primary sections, and H3 for subsections beneath those. Wix applies your theme's heading styles consistently, and proper heading hierarchy helps search engines understand your page structure, which matters for indexing and ranking.
Step 6: Update Global Fonts for Site-Wide Changes
If you want to change the font across your entire site rather than editing each text box individually, use Global Fonts. In the Wix Editor, click the 'Site Design' icon (or go to Design > Global Fonts) and choose a new font pairing for headings and body text. This updates every text element that uses theme fonts in one step, without touching individual text boxes.
Step 7: Preview and Adjust Text on Mobile
Click the mobile icon at the top of the Wix Editor to switch to the mobile view. Text that looks right on desktop often needs adjustment on mobile. Font sizes that are comfortable at 1200px can feel cramped or oversized on a 375px screen. Check each page's text in mobile view before publishing, and drag text boxes or adjust sizes as needed. Changes you make in mobile view do not affect the desktop layout.
Types of Text in Wix
Wix gives you four text element types, each designed for a different use case. Understanding what each one does helps you pick the right one for the job rather than defaulting to a plain text box every time.
Text Themes
Text Themes apply your site's pre-set typography, including font family, size, weight, and color, to a new text block. When you use a Text Theme, any future changes to your Global Fonts automatically update that element. This is the best choice for body copy and general page text because it keeps your site visually consistent without manual upkeep.
Title
Title elements are large, prominent text blocks designed for section headers and page titles. They pull from your site's heading styles (H1, H2, etc.) by default. Titles draw the eye and help visitors scan your page quickly. For SEO, set your most important title on each page to H1. Only use one H1 per page.
Collapsible Text
Collapsible Text shows a short preview and expands to reveal the full content when a visitor clicks it. This is practical for long product descriptions, terms and conditions, FAQs embedded in a page body, or any content where you want to keep the page visually clean without cutting the information. Visitors who want the detail can get it; others aren't forced to scroll past it.
Text Mask
Text Mask fills your letters with an image, video, or gradient instead of a solid color. The result is a decorative heading where the visual fills the letter shapes. This works well for hero sections, event pages, or branded splash screens where you want a distinctive typographic treatment. It's a design element rather than a content element, so use it for headings rather than body text.
How to Copy Text Styles Between Elements in Wix
One of the most underused features in the Wix Editor is the ability to copy a text element's formatting and paste it onto another element. This saves a significant amount of time when you want multiple text blocks to match without manually adjusting each font, size, color, and weight setting one by one.
Here is how to do it:
- Click the text element whose formatting you want to copy.
- Right-click and select Copy Style from the context menu (or use the keyboard shortcut Ctrl+Alt+C on Windows, Cmd+Option+C on Mac).
- Click the text element you want to apply the style to.
- Right-click and select Paste Style (Ctrl+Alt+V on Windows, Cmd+Option+V on Mac).
The second element now matches the first element's font family, size, color, weight, and alignment. The text content itself does not change, only the visual formatting.
Pasting Text Without Carrying Over External Formatting
When you copy text from an external source such as a Word document, Google Doc, or web page, the text often carries its original formatting with it. Pasting it directly into a Wix text element can introduce inconsistent fonts, sizes, or colors that clash with your site's design.
To paste plain, unformatted text into Wix, use Ctrl+Shift+V (Windows) or Cmd+Shift+V (Mac) instead of the standard paste shortcut. This strips all external formatting and applies only your Wix element's current style to the pasted text, keeping your typography consistent across the page.
This trick is particularly useful when building pages from existing documents or when collaborating with a copywriter who works in a different text editor.
Text SEO Best Practices in Wix
The way you format and structure text on your Wix site has a direct effect on how well pages rank in search results. Most Wix users focus on keywords but overlook the formatting signals that tell Google how to read and evaluate a page.
Use Heading Tags Correctly
Wix supports H1, H2, H3, H4, H5, and H6 heading tags. Each page should have exactly one H1, which should contain your primary keyword and describe the page's main topic clearly. Use H2 for major sections and H3 for subsections within those sections. Never skip levels, such as jumping from H1 directly to H3. Search engines use heading hierarchy to build a mental map of your page's structure. A well-structured page is easier to index and easier to rank.
A common mistake in the Wix Editor is increasing a text block's font size to make it look like a heading without actually applying a heading tag. To a reader, it looks like a heading. To Google's crawler, it's just large body text. Always use the heading style selector in the text toolbar, not font size, to create real headings.
Avoid ALL CAPS in Body Text
Using ALL CAPS for body text creates two problems. First, it is harder to read. Studies consistently show that lowercase text is processed faster than uppercase text because readers recognize word shapes, not just individual letters. ALL CAPS removes those shape cues. Second, screen readers often read all-caps text letter by letter rather than as whole words, creating a poor experience for visually impaired visitors.
For emphasis, use bold or italic formatting instead. Reserve ALL CAPS for short labels, button text, or navigation items where convention makes it acceptable.
Keep Line Length Between 50 and 75 Characters
Readability research has consistently found that lines between 50 and 75 characters per line are easiest to read on screen. Lines shorter than 50 characters create too many line breaks, which disrupts reading flow. Lines longer than 75-80 characters require the eye to travel too far across the page, which increases reading fatigue and causes readers to lose their place.
In the Wix Editor, control line length by adjusting the width of your text box rather than forcing line breaks manually. On a standard 1200px desktop layout, a text box set to about 60-65% of the page width typically hits the 50-75 character range for body text set at 16-18px.
Font Size Affects Bounce Rate and Time on Page
Small font sizes push visitors away faster. Most Wix templates default to 14-15px body text, which is below the recommended minimum of 16px for comfortable reading on desktop. Text that requires effort to read increases bounce rate directly, and a high bounce rate signals to Google that the page is not satisfying user intent.
Set your body text to at least 16px in the Wix Editor. For older audiences or content-heavy pages, 17-18px is worth considering. Heading sizes should scale proportionally: your H1 should be noticeably larger than your H2, which should be noticeably larger than your body text. This contrast helps visitors scan the page and find what they need quickly.
Internal Linking Within Text
Linking key phrases in your body text to related pages on your site does two things. It helps visitors find more relevant content, which increases time on site, and it passes authority between pages, which supports the ranking of both the linking page and the target page.
When adding text in the Wix Editor, look for natural opportunities to link to related guides. For example, if a paragraph mentions customizing fonts, link that phrase to your Wix fonts guide. If it mentions building a blog, link to your blog setup guide. Keep anchor text descriptive and specific. Phrases like "Wix font customization guide" tell Google more about the linked page than "click here" ever will.
Wix Text Editing Tips
The steps above get you started. These tips help you avoid the most common issues users run into when working with text in Wix.
- Don't use ALL CAPS in your text editor for emphasis. Use bold or a heading style instead. All-caps text reduces readability and is harder for screen readers to process correctly.
- Keep paragraphs short. Aim for 3-5 sentences per paragraph. Long blocks of text push visitors away, especially on mobile. Use line breaks between paragraphs rather than a single long wall of text.
- Set character limits on form text fields. If your page includes a Wix Form, you can cap text input length at 0-5,000 characters in the Advanced settings of each field.
- Use the AI Text tool sparingly. 'Create AI Text' in the text editor can generate filler content, but review and rewrite it before publishing. Generic AI copy reads as thin content to search engines.
- Check contrast before publishing. Light grey text on a white background is a common accessibility failure. Use a contrast ratio of at least 4.5:1 for body text. Wix's color picker doesn't warn you about low contrast, so check manually.
For more on shaping how your site looks and feels overall, see our guide on how to design a website with Wix, which covers layout, color, and typography in depth.
How To Add And Edit Text On Wix: Summary
Adding text on Wix takes three clicks: open the Add panel, choose a text type, and start typing. Editing it is just as fast. Click the element, hit 'Edit Text', and adjust in the side panel. For site-wide font changes, use Global Fonts under Site Design rather than editing individual text boxes. Use Copy Style (Ctrl+Alt+C) to match formatting across multiple elements instantly. Always switch to mobile view before publishing to check that your text reads well on smaller screens.
If you want to put your text skills to work with regular blog posts, our guide to creating a blog with Wix covers everything from installing the Blog app through publishing and promoting your first posts.
* read the rest of the post and open up an offer