
When a URL on your Wix site changes, a 301 redirect tells browsers and search engines where to find the content at its new address. Without one, visitors hitting the old URL see a 404 error, and any search engine authority built up on that page is lost. A 301 redirect is permanent, it passes link equity to the new URL and updates search engine indexes over time. This guide walks through every scenario: single redirects, group redirects, bulk imports, and how to verify each one is working correctly.
Wix includes a built-in URL Redirect Manager in your SEO settings, no plugins or code needed, This guide walks you through each step to ensure clean traffic redirection from outdated to updated pages.
Step-by-Step Guide to Setting Up a 301 Redirect On Wix
Here is how you can set up a Wix URL redirect step by step.
Step 1: Go to Your 'SEO Settings' in Your Wix Dashboard
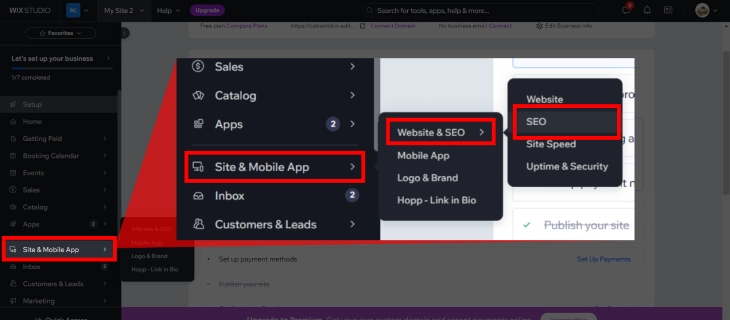
In your Wix site's dashboard menu, click on 'Site & Mobile App'. A window will appear, select 'Website & SEO'. Another window will appear where you can click on 'SEO' to open your site's SEO settings. This is also where you can manage other SEO elements like keywords for your Wix website.
Step 2: Select 'URL Redirect Manager' under 'Tools and settings'
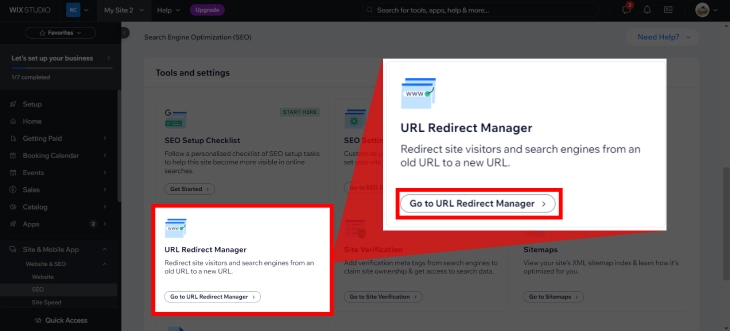
In the Search Engine Optimization (SEO) section, scroll down until you find 'Tools and settings'. Click on 'URL Redirect Manager' to add your 301 redirect on Wix. This feature redirects site visitors and search engines from an old URL to a new one, ensuring no traffic is lost.
Step 3: Click '+ New Redirect'

Once you've clicked on 'URL Redirect Manager', a new section will appear. You can either click '+ New Redirect' beside 'More Actions' at the top of the section, or click '+ Create New Redirect' in the 'Your redirects' section to begin adding your Wix redirects.
Step 4: Select 'Single Redirect'

A new window will appear where you can choose between 'Single redirect' or 'Group redirect'. Select 'Single Redirect' for a one-to-one URL mapping. If you need to redirect multiple URLs that share the same path structure, for example, if you've restructured an entire section of your site, use 'Group redirect' instead. This is especially useful after a domain migration or site restructure; see our guide on how to change your domain name on Wix for the full workflow.
Step 5: Paste Your Old URL & New URL
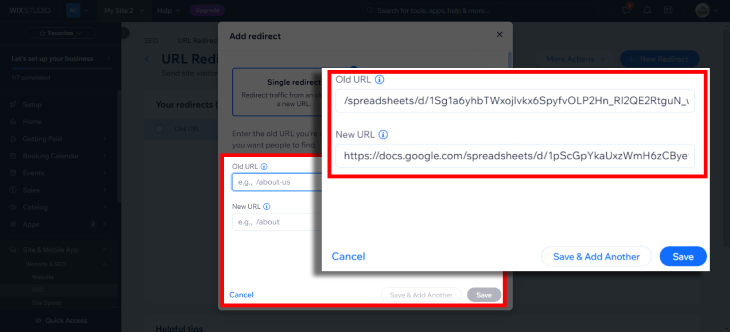
Below the redirect type options are two text fields where you'll enter the old URL and new URL. The old URL is the original address you're directing traffic away from, and the new URL is the destination, either a page on your Wix site or an external URL. Wix will automatically trim the domain if you paste the full URL for internal pages. For external pages, always include the full URL including https://.
Step 6: Click 'Save' or 'Save & Add Another'

After filling out both text fields for the old and new URL, click 'Save' to close the window, or 'Save & Add Another' to keep adding more Wix URL redirects in sequence. Once saved, the redirect is live immediately, you can test it by visiting the old URL in your browser.
How to Set Up a Group Redirect on Wix
A group redirect lets you redirect all URLs that match a specific path prefix in a single rule. Instead of creating dozens of individual redirects after a site restructure, one group redirect handles the entire batch. This is the right tool when you've renamed a section of your site, for example, changing /products/ to /shop/, and every page under that path needs to redirect to the new path.
Here's how to set up a group redirect in Wix:
- Go to your Wix dashboard and open the URL Redirect Manager (same path as above: SEO Settings → Tools and settings → URL Redirect Manager).
- Click + New Redirect, then select Group Redirect from the options.
- In the Old URL prefix field, enter the old path segment, for example,
/blog/or/products/old-category/. Do not include your domain name. - In the New URL prefix field, enter the replacement path, for example,
/articles/or/shop/new-category/. - Click Save.
When the group redirect is active, any URL that starts with the old prefix will redirect to the equivalent new URL. For example: yourdomain.com/blog/post-title redirects to yourdomain.com/articles/post-title. The slug after the prefix is preserved automatically.
Important: Group redirects apply to ALL URLs under that prefix, make sure you're not accidentally redirecting pages that should stay at their current addresses. Test a sample URL before relying on the rule site-wide.
How to Check If Your 301 Redirect Is Working
After setting up a redirect, always verify it's functioning before considering the job done. There are three reliable ways to test a Wix 301 redirect:
Method 1: Browser Test
The simplest check: open a private/incognito browser window and paste the old URL into the address bar. If the redirect is working, your browser will load the new URL's page and show the new address in the address bar. If you see the old address still showing, or a 404 error, the redirect either didn't save or is misconfigured.
Method 2: HTTP Header Checker
A browser test tells you what a visitor sees, but doesn't confirm the exact HTTP response code. To verify the server is sending a 301 (not a 302 or another code), use a free tool like Redirect Checker or httpstatus.io. Paste the old URL, run the check, and confirm the response chain shows 301 Moved Permanently pointing to the correct destination. If it shows 302 Found, the redirect is temporary, contact Wix support, as the URL Redirect Manager should always create permanent 301s.
Method 3: Google Search Console URL Inspection
For redirects on important pages, use the URL Inspection tool in Google Search Console. Paste the old URL and run the inspection. Google will tell you if it detects the redirect, what the canonical URL is, and whether the new URL is indexed. If the old URL still shows as indexed even after adding the redirect, request indexing on the new URL, it may take a few crawl cycles for Google to fully transfer the signals.
How to Bulk Import Redirects on Wix
If you have many redirects to set up at once, for example, after migrating from another platform to Wix, manually entering each one would be time-consuming. Wix's URL Redirect Manager supports bulk import via a CSV file, which lets you upload hundreds of redirects in one go.
To bulk import redirects on Wix:
- In the URL Redirect Manager, click More Actions (the three-dot menu or the button at the top of the redirects list).
- Select Import Redirects.
- Download the CSV template Wix provides. The template has two columns:
Old URLandNew URL. - Fill in your redirects in the CSV. Use relative paths for internal pages (e.g.,
/old-page) and full URLs for external destinations (e.g.,https://example.com/new-page). - Save the CSV and upload it back into the import dialog.
- Wix will validate the file and show you a preview before applying. Review for errors, then confirm the import.
After importing, spot-check a handful of redirects using the browser or header checker method above to confirm they're working as expected.
301 Redirects vs. Canonical Tags on Wix: Which Should You Use?
Both 301 redirects and canonical tags address problems caused by duplicate or relocated content, but they work differently and suit different situations. Choosing the wrong tool sends mixed signals to search engines.
A 301 redirect is a server-level instruction that permanently sends visitors and crawlers from one URL to another. The old URL stops working as a destination and all its accumulated authority flows to the new URL. Use a 301 when content has genuinely moved for good and you want the old address to stop existing as a live page.
A canonical tag is an HTML signal placed in the <head> that tells search engines which URL is the "official" version when the same content is accessible at multiple addresses. Both URLs remain live; you are simply nominating one for indexing. Use a canonical when you want to consolidate ranking signals without breaking the other URL, for example when product pages are reachable with and without tracking parameters.
| Use case | 301 Redirect | Canonical Tag |
|---|---|---|
| Page permanently moved to a new URL | Yes, old URL stops working | No, both URLs stay live |
| Same content at multiple URLs (e.g. UTM parameters) | Not ideal, breaks the variant URL | Yes, designates the preferred version |
| Full domain rebrand or migration | Yes, redirect every old URL to its new equivalent | No, canonical cannot cross domains reliably at scale |
On Wix, 301 redirects are set up through the URL Redirect Manager as shown above. Canonical tags are controlled per page under SEO Settings in the Wix Editor. One important limitation: canonical tags only work on pages you control. If an old URL is on a domain you no longer own or have access to, a canonical tag there is not possible, and a 301 redirect at the DNS or hosting level is the only option.
What Happens to 301 Redirects If You Cancel Your Wix Plan?
This is a question most guides skip entirely, but it matters if you are considering downgrading or leaving Wix.
When you downgrade to Wix's free plan or let a paid plan lapse, your custom domain disconnects from the site. The site itself remains active on its Wix subdomain (e.g. yourname.wixsite.com/site), and any redirect rules you created in the URL Redirect Manager are still saved in your Wix account. However, those rules will stop functioning for your custom domain because the domain is no longer connected to Wix's servers.
- Wix-to-Wix internal redirects (one page on your site pointing to another page on the same site) remain active as long as the Wix site itself is live.
- Custom-domain redirects (e.g.
yourdomain.com/old-pagepointing toyourdomain.com/new-page) stop working once the domain is disconnected from Wix.
If you are migrating away from Wix to another platform, your redirect rules do not transfer automatically. You will need to recreate them at your new host or within your new platform's redirect settings. Before cancelling or migrating, record every redirect rule you have set up, either by screenshotting the URL Redirect Manager or copying the entries into a spreadsheet.
Why Use a 301 Redirect on Wix?
When it comes to managing a website, there are often times when you need to make changes to your site's structure, content, or branding. A 301 redirect on Wix is the right tool for permanent changes, it tells search engines that a page has moved for good, passing along accumulated link equity and rankings to the new URL.
Here are the key reasons to use a Wix redirect:
Rebranding
Rebranding often involves changing your website's domain name or URL structure. A 301 redirect ensures that users trying to access your site through the old URLs are automatically directed to the new ones, maintaining your audience during the transition and preventing traffic loss from outdated links.
Content Updates
As your business or website evolves, you may need to update or reorganize your content. When you move a page to a new URL, a 301 redirect on Wix ensures that visitors who try to access the old page are automatically directed to the new, updated content. It transfers the search engine rankings, link equity, and traffic from the old URL to the new one.
Broken Links
Over time, it's common for websites to accumulate broken links, either due to changes in your own site or updates made by external sites that link to you. This is especially important when you delete a page on Wix, as the old URL will return a 404 error without a redirect. Using a Wix redirect can point these broken links to the correct, working pages, maintaining your site's functionality and credibility.
SEO Optimization
A 301 redirect is a powerful SEO tool. It tells search engines that a page has permanently moved, transferring the old page's search engine rankings and link equity to the new one. This helps maintain your site's search engine visibility even when you change URLs, and prevents search engines from indexing multiple versions of the same content, avoiding potential duplicate content issues.
Common 301 Redirect Mistakes on Wix
Even with a straightforward tool like Wix's URL Redirect Manager, there are common errors that undermine your redirect strategy.
Redirect Chains
A redirect chain occurs when URL A redirects to URL B, which then redirects to URL C. Each hop in the chain dilutes the link equity passed and slows down page load for users. If you've changed a page's URL more than once, make sure all older redirects point directly to the final destination, not to an intermediate URL that itself has a redirect.
Redirect Loops
A redirect loop happens when URL A redirects to URL B, and URL B redirects back to URL A. Browsers will detect this and show an error. Double-check that your old and new URLs don't form a circular reference before saving.
Redirecting to a 404 Page
If the destination URL in your redirect doesn't exist, because you mistyped it or later deleted that page too, visitors and search engines arrive at a dead end. Always verify the new URL loads correctly before saving the redirect.
Using 302 Instead of 301
Wix's URL Redirect Manager creates 301 redirects by default, but if you're adding redirects through custom code or a third-party tool, make sure you're specifying 301 (permanent) not 302 (temporary). A 302 tells search engines not to update their index with the new URL, meaning no link equity is transferred.
Forgetting to Redirect Old Subpages
When you move a parent page to a new URL, don't forget the subpages. If /services moves to /what-we-do, each subpage (/services/design, /services/marketing) also needs a redirect to its new equivalent, or you can use a group redirect to handle the entire path at once.
Final Checklist: Wix 301 Redirects
Setting up a 301 redirect on Wix is one of the most important steps you can take to protect your SEO rankings whenever URLs change. The built-in URL Redirect Manager makes the process straightforward, a few clicks is all it takes to redirect traffic permanently and cleanly. Whether you're rebranding, restructuring content, or cleaning up broken links, Wix redirects ensure visitors and search engines always land on the right page.
Before considering any redirect job done, run through this checklist:
- Old URL returns a 301 status in a header checker tool (not 302 or 404)
- New URL loads the correct page
- No redirect chains, old URL goes directly to final destination
- No redirect loops, new URL doesn't redirect back to old URL
- All subpages under the old URL are also redirected
- Google Search Console has been notified (request indexing on the new URL)
Combined with strong on-page SEO, such as properly configured meta tags, a well-managed redirect strategy keeps your Wix site competitive, professional, and fully optimized for search.
301 redirects are also essential any time you change your primary domain, see our complete guide on changing your domain name on Wix for the full step-by-step migration process.
* read the rest of the post and open up an offer